 Selections
Selecting your audience is one of the focal points in your campaign. Knowing who is going to be targeted with a specific media will be key to help with suggestions for the copy of the email, subject lines and so on.
Create a new selection or add an existing (template) selection

Source lists are a blended, filtered or complete set of data from the database. The fields in the source list are filtered to identify the intended target market. All fields in a source list can be used as merged fields anywhere in the campaign. Also see, User Defined Fields.
Templates
Add an existing selection by clicking on the open from template hyperlinked text in the pale blue toolbar 1. Wildcards (*) can be used when searching for a selection name 2. Highlight the required selection by clicking in the blue box to the left of the selection name 3. Click the Pick button 4.
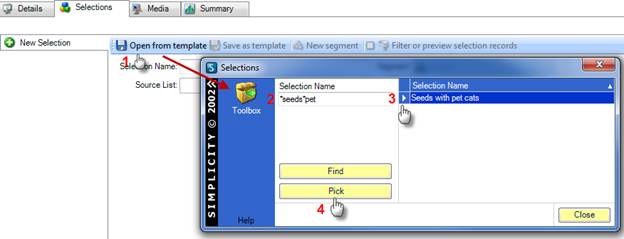
Note: Templates are often saved with a Segment name. If the template you select has a segment name that does not exist in your campaign there will be a red circle next to the segment name 1. You will need to add a New segment 2 with the same name or select the segment name you have already set up in the Details tab 3.
Seeds with Cats
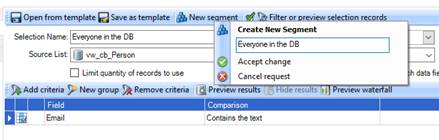
New Selection
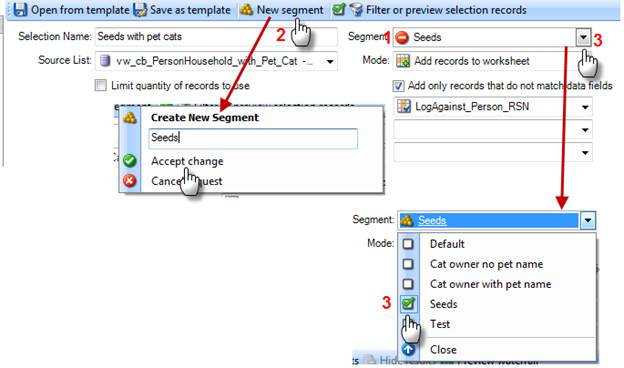
To add a new selection to the campaign, click on New Selection. Type in the Selection Name. Select the Segment that applies to the selection and select the appropriate source list.
Source List: A blended, filtered or complete set of the database. Source lists are pre-defined and loaded by Simplicity.
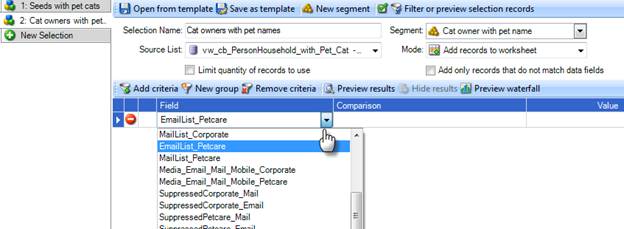
Field: Options available will be dependent on the Source List selected.
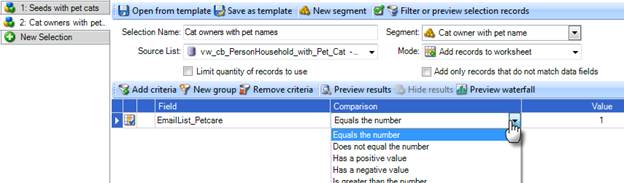
Comparison: The connector or comparer between the field and value.
Value: A value for the selected field to be compared or matched to.
Source Lists
vw_cb_PersonList - Simplicity Analytics
All persons in the database. Use this source list for Seeds and Test records (where the test person does not have a pet associated to them)
vw_cb_CampaignActivity_Person_AllRecords - Simplicity Analytics
All persons in the database with all their campaign activities. This source list can be used to re-send previous campaign recipient lists based on campaign activity details or remove recipients from current campaigns based on previous campaign activity.
Red Icons on Selections and/or Segment:
If a red crossed icon shows up at the beginning of the source list:
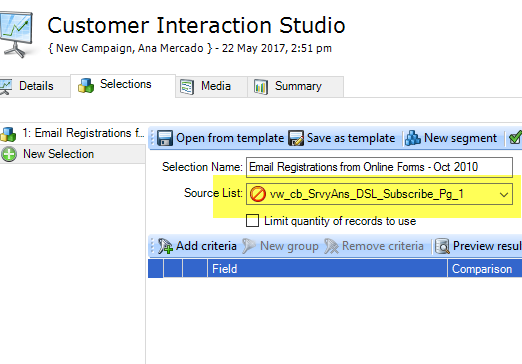
- The source list name could have changed since you last opened the campaign. Click on the right arrow to open the drop down box and check if underneath there is a similar named source list, this could be the one you need
- If the source list was referring to an external file it is possible the file has been moved from the location it was saved when dropped in the tool box. External files need to stay in the same location on the local hard drive for Simplicity to read them. If you need to move this file then another connection will need to be set up (that is move the file to the new location and drag and drop it in the tool box again)
- The source list could have been deleted all together under administrator request. Contact Simplicity for more information.
If a red crossed icon shows up at the beginning of the segment:
The segment does not exist in the campaign. You’ll need to add a segment against this selections otherwise the campaign execution will fail. The list of segments can be confirmed by going into the “details” tab > Segments: Here you will find a list of ALL segments created in the campaign. Not all of them may be in use at the time, but they have been created.
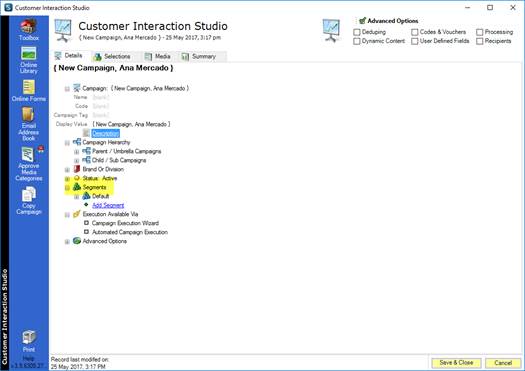
If you do not want any Segment to be in the list anymore: Right click on it and select “Remove Selection”:
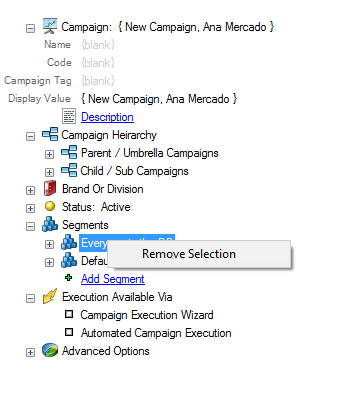
You can also add Segments from here without going back to the “Selections” Tab:
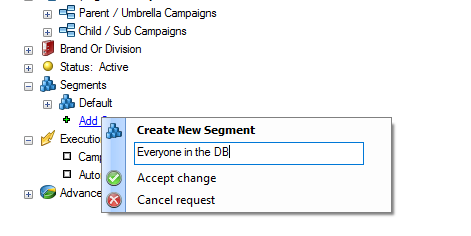
You can also add a Segment from the selections tab: New Segment.
Adding the filter criteria
In the horizontal pale blue tool bar, click on the hyperlinked text “Filter or preview selection records”.
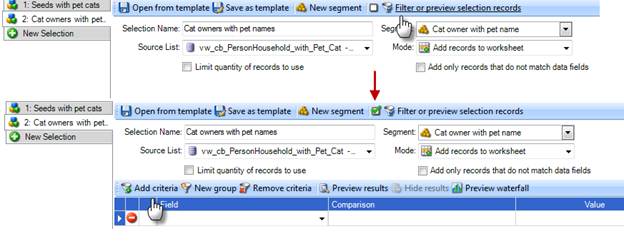
1. Click on the down arrow in the field column to select a field
2. Choose the comparison option and enter the value
Repeat 1. and 2. above until all selection criteria has been added.
Preview results
Click on Preview results to get a record count and display the first 500 rows of data. Note: The record count and displayed data does not include any de-dupe rules or any other data restriction rules that may have been applied to the selection. Run a Summary to get the data counts for the campaign.

Hide results
To hide the record count and first 500 rows of data, click on Hide results.

Remove criteria
To remove filter criteria highlight the row to be remove by clicking on the white arrow in the left column. Click Remove criteria.
Remember, there is no “control Z” in Simplicity so check you have highlighted the correct row before you click “Remove criteria”. Multiple rows can be selected by holding down the control (Ctrl) key on your keyboard while selecting the rows to be removed.

Note:
LAST IN FIRST OFF!
Add selections in order of priority.
Example:
- Selection criteria Segment 1: Recipients who regularly interact with the Database and have indicated they purchase high end pet food products. These recipients will receive an email they can print out to redeem $5.00 off their next 2kg pet food purchase.
- Selection criteria Segment 2: Recipients who regularly interact with the Database and have indicated they purchase other pet food products. These recipients will receive a $2.00 off coupon. If a recipient regularly interacts with the Database and indicated they purchase both high end products and well as other products they will fall into both selection criteria. If the high end selection is the second selection the recipient with stay in the first (other) selection, therefore receiving only the $2.00 off coupon.
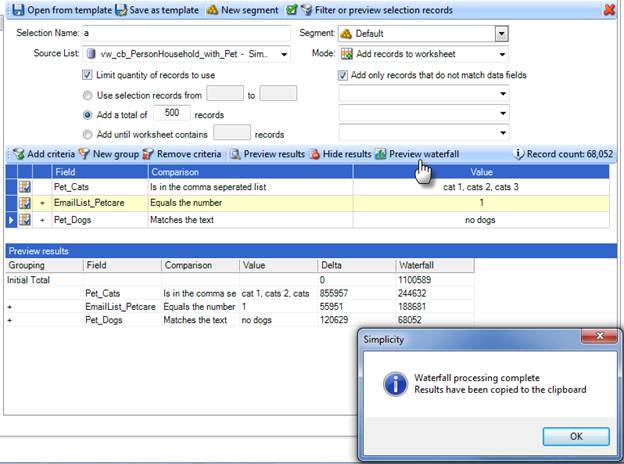
Preview waterfall
The waterfall preview displays the number of Delta (data not included) records and Waterfall (data after filter criteria has been applied) records. The Initial Total is the number of all records in the source list.
Note: The waterfall count(s) does not include any
de-dupe rules or any other data restriction rules that may have been applied to the selection.
The results can be pasted into a Word document or text editor.
New group
“Or” — match the following fields (as well as) the filter criteria already selected.
Note: Most of the fields will need to be repeated in each group. For example, a recipient must be opted into the database, have a cat with the cats name and feed their cat either Brand A or Brand B. Compare the count in this screen to the count in the screen on the following page.
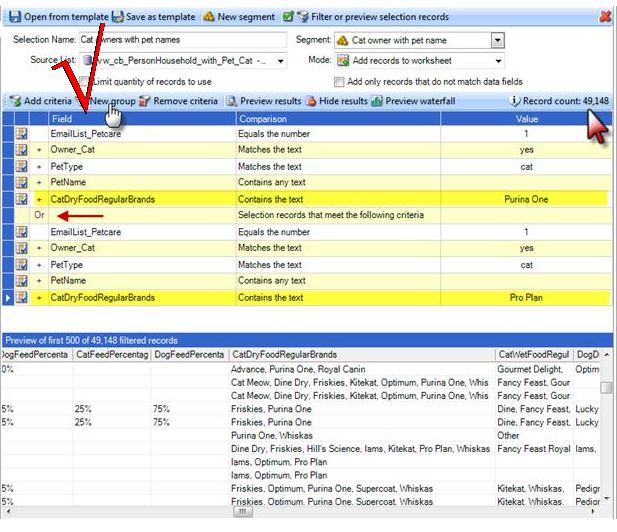
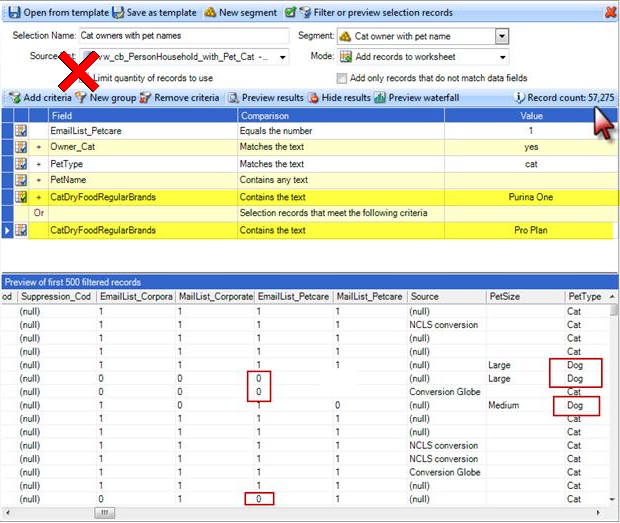
You will notice the number is higher in the second screen (following page). This is because the second grouping of selection criteria has omitted that the recipient must be opted in and have a valid email address (EmailList_Petcare = 1) and have a Cat with a pet name. You could potentially be sending an email to a person that has opted out of receiving communication or be sending a personalised email relating to a cat with the recipient’s dog name in the email.
Comparisons
In some instances, the adding of filter criteria can be minimised by using specific comparison options.
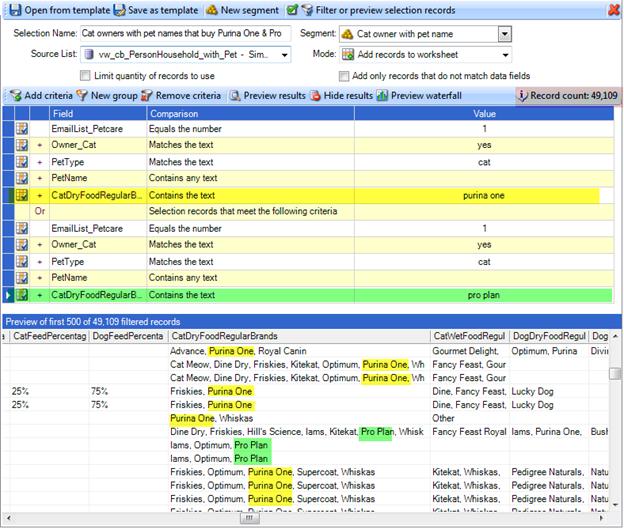
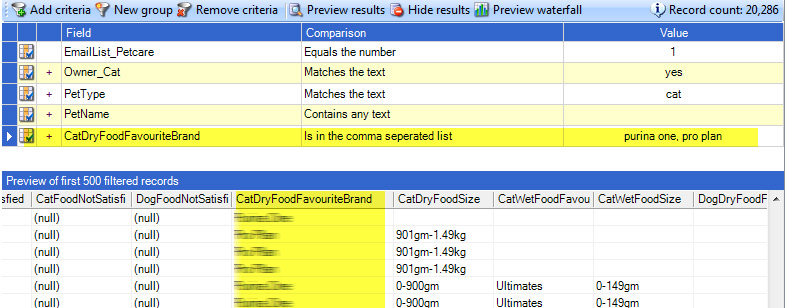
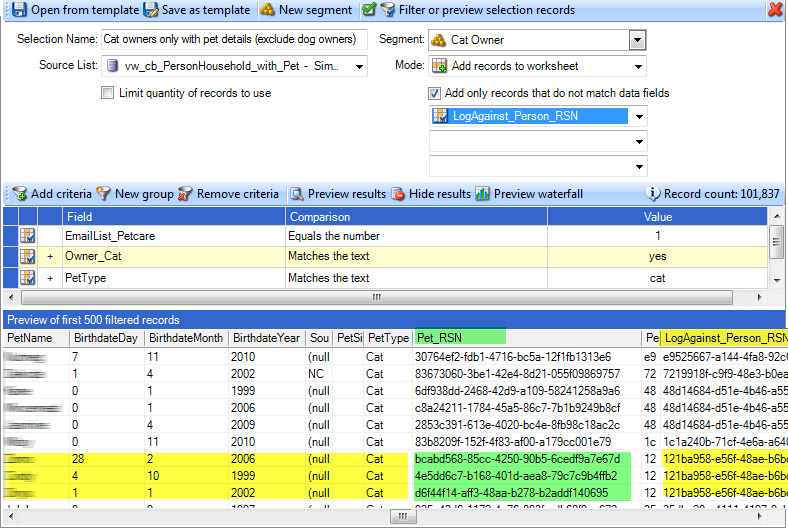
The above example specifies a Person must be opted in (EmailList_Petcare = 1), own a cat (Owner_Cat = yes), the cat must have a name (PetType = cat; Petname contains any text) and buy Dry food, OR buy Pro Plan Dry Food.
The same result can be achieved by using the comparison option “Is in the comma separated list”.
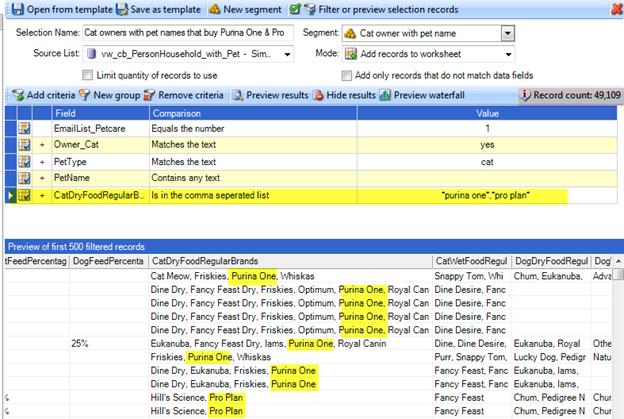
Note: Some fields can contain multiple answers (multi lists) as shown above in the CatDryFoodRegularBrands field and some fields will contain single answer options (single pick) as in the CatDryFoodFavouriteBrands field shown below.
If using a multi list field add wrapping astericks to the required answer value, eg *brand a*.
Data field a text value but number ranges are required?
Use the comparison “Occurs alphabetically …”.
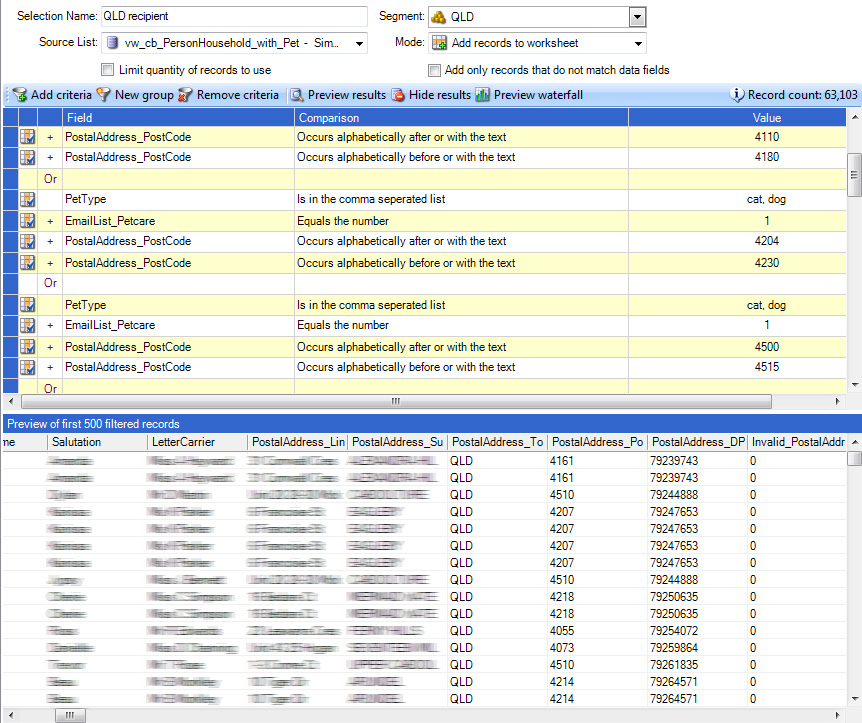
Example: To return all recipients in a specific postal zone add the postcode field and select the comparison Occurs alphabetically after or with the text. Add the first postcode of the required postal zone in the Value field. Add another filter criteria using the same postcode field but choose the Occurs alphabetically before or with the text comparison option. Add the last postcode in the required postal zone. Add New Groups if a series of postal zones are required.
Target audience needs to be a specific age range?
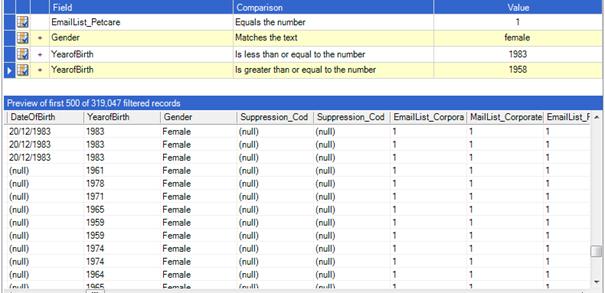
Select the Year of Birth field with the comparison option Is less than or equal to the number and enter the year of the minimum age for the required age range. Add a second Year of Birth field and use the comparison option Is greater than or equal to the number and enter the year of the maximum age for the required age group range.
Note: Multiple selections can use the same segment. Adding multiple New Group selections can sometimes be tedious and time consuming. It may be easier to template the first selection, save as a
template, create the second selection from the newly created
template and change the appropriate field(s)
Mode
Mode is a drop down option list that will set up your selection to be adding records to your selection or excluding records. When excluding records the selection is usually called: Removal. E.g. the campaign will be targeting everyone in the database with a valid email address except records that bought a specific car model within the last 6 months. For this example we would set up a full database selection and a second selection as a removal to exclude the 6 months buyers. Below how the selections would be set up:
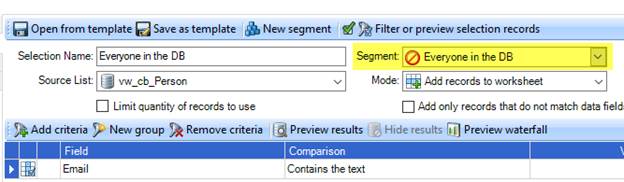
Everyone in the Database with a valid email address: after naming your selection, name that will only display later on in reporting, all options will automatically display. A segment is usually created for the named selection, it can be named equally as the selection or completely different, this wouldn’t affect its purpose. Segments will be utilized later on against media files, user defined fields, deduping rules and so on, and they are the link between our audience and what you want to assign to it. To start adding filters to your source list please tick “Filter or preview selections records” right at the top.
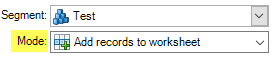
As you can see in the image below we can add filters to the selection to achieve the “validate” the email address column, for example every email address needs to contain, in order to be valid, an “@”. Mode would be set up to “Add records to worksheet” and this is usually set up by default. The source list will depend on how your database have been split and your database administrator will be able to help you with this; although there is usually a “vw_cb_PersonList” set up that contains every records in DB.
Add records to worksheet
This is the default setting. Adds records to the worksheet based on the selection/filter criteria in the current selection.
Ticking the “Add only records that do not match data fields” can be used as a deduping tool. Recipients can be in multiple selections or in a selection multiple times, eg, if the selection criteria specifies Pet_Type = cat, a person with three cat records associated to their record will return the person record in the same selection three times (one entry for each pet record associated to the person). Select a common denominator field, eg, email or LogAgainst_Person_RSN, to match against.
A record will only be added to the worksheet if the field chosen to match on is not already in the current or any previous selections.
Note: The preview will show duplicate records. Run a Summary to get selection/segment and campaign counts.
Remove records from worksheet
The second part of our example would be the removal. As before explained “Mode” option will be “Remove records from worksheet”, you’ll also need to let the selection know which column in the source is going to be used to remove against; you can remove records based on email address, log against person RSN, postal address, phone number or any other column in the source. Bear in mind all source lists will need to share the same column names e.g. Email could be used in the source list “vw_cb_PersonList” yet the source list used for transaction history data (as the image below) “vw_cb_Vehicle_Owners_Drivers” could be using EmailAddress, this makes it a complete different column therefore the removal will pick up 0 records to be removed.
Add the selection criteria to define the records to be removed from the campaign worksheet.
Select the segment(s) the matched records are to be removed from.
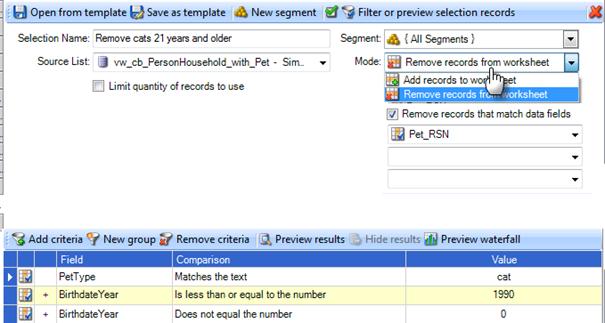
The above example will remove all recipients in the previous segments if their pet cat is older than 21. A recipient may be in previous selections/segments multiple times because they have more than one cat. If only one cat is older than 21 years, only the record with the cat that is 21 years old will be removed from the worksheet.
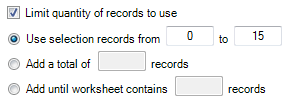
Limit quantity of records to use
Control the number records being added to the worksheet.
There are 3 options to add records to a worksheet.
- Use selection records from x to y. The records are imported into the worksheet as the filter criteria is specified
- Manually assign a specific number of records to each selection. To do this you need to click on “Add a total of” and type in your desired volume.
- Add records accumatively, by using “Add until worksheet contains” function. This function will allow you to take all volume from selection one, then selection two so forth. If you want to specify the volume of each selection using this function, you simply need to type in your desire accumulative volume as per the example below.
To add only records that do not match data fields choose from selection available — options will depend on the Source List chosen.
After the first send of your campaign, if you do want to execute the campaign for a second and final time and you don’t want the records who already received the email to receive it again, you’ll need to add a “Removal” (refer to removals above in this document). This removal is to be based on campaign activity, targeting people who already received the campaign. Example below:
Activate the options by ticking the box under the source list options.
Use selection records from X to Y
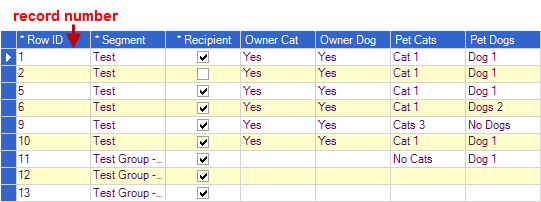
Record numbers are sequential and are created as each record is entered into the worksheet.
Add a total of X records
Add the number of records required for each selection.
For example, if you have four selections and you want a total of 1000 records from each selection repeat the Add a total of 1000 records in each selection. A total of 1000 record for each record will be add the worksheet, unless the record count is less than the total numbers records required. See example selection set up on following page.
Example of four selections where 1000 records are required from each selection
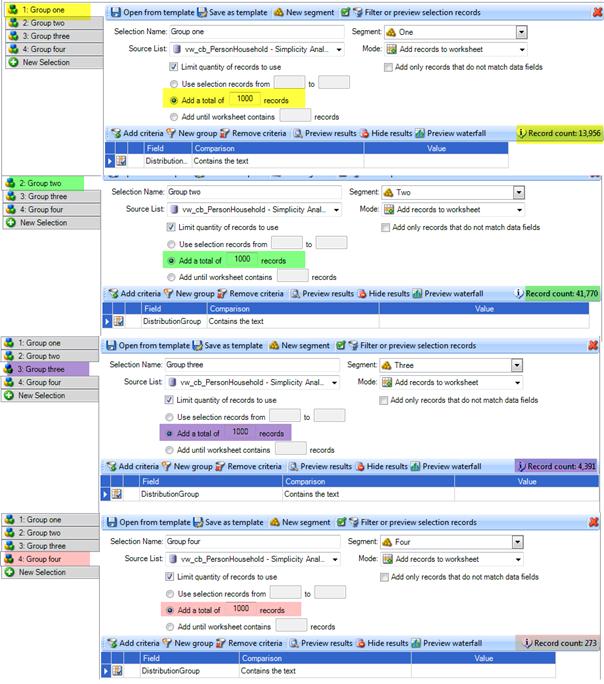
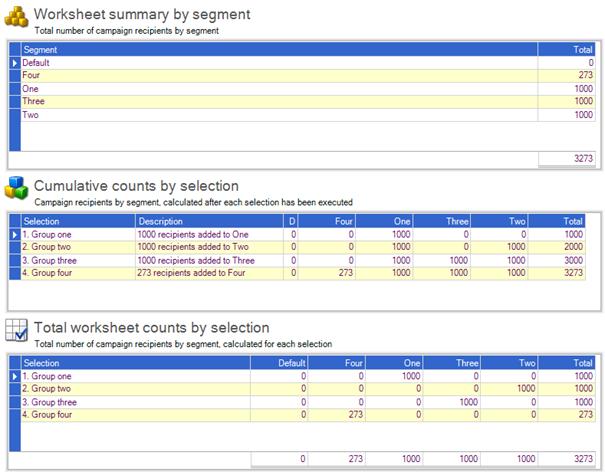
The result from the above example would be:
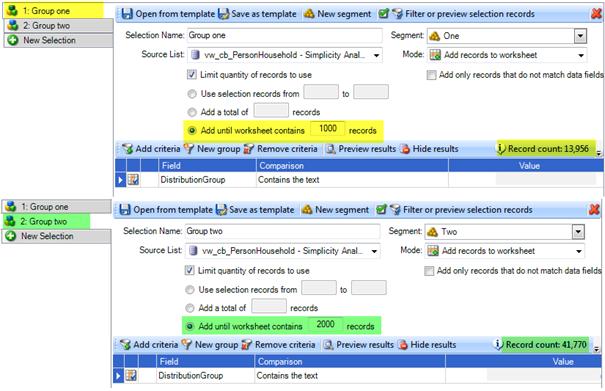
Add until worksheet contains X records
Records will be added to the worksheet until the required total amount is reached.
If using this option across more than one selection you need add accumulative records numbers to the next selection.
For example, if 1000 records are required in Group One selection and 1000 records are require in Group Two selection you would Add until worksheet contains 2000 records in the Group Two selection. If you add until the worksheet contains 1000 records in the second selection this would return a zero result as the worksheet already contains 1000 records from the previous selection. See example on following page.
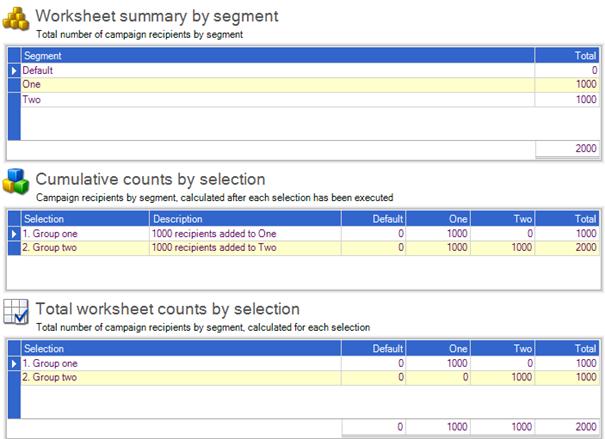
Example of adding records to worksheet until required number is reached
The result from the above example would be:
Note: If using dedupe rules you will need to adjust your record numbers to allow for the removal of the duplicated records. Use the Summary tab to get selection/segment numbers and then adjust the record numbers accordingly.