Media
Media
Setting up your media when you have a complete brief it is, along with your selections, the most time consuming task in your campaign. You can create text versions of an email or full HTML coded, you can also set up a dynamic page for your email or what we usually call “view online” version, and you can set up a data extract as well just to provide an extract of all those records you have selected before in your selections tab. Simplicity also provides you the option of sending SMS campaigns, if you’d like to do so you will need to set up your provider so please get in contact with your account manager to get all the elements set up for your SMS campaign.
New Email
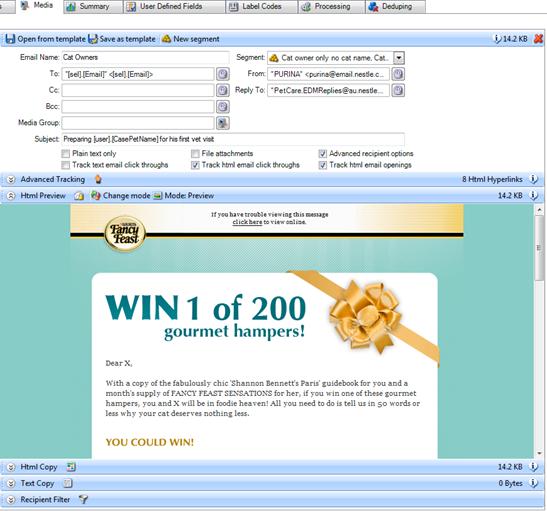
Click on New Email in the Media Workspace Selections Tabs (left panel).

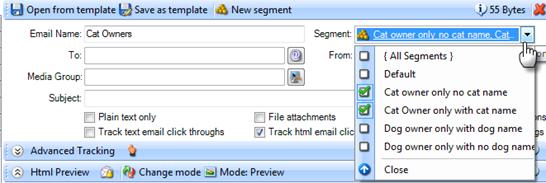
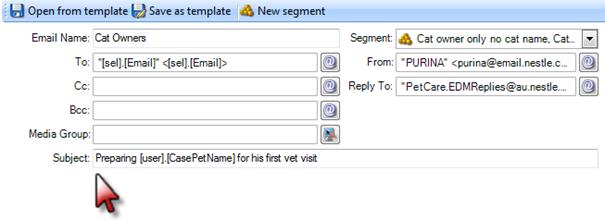
Type in the email name to activate the email workspace.
If there is more than one email media for the campaign, select the segment(s) the media will apply to. Default is {All Segments}.
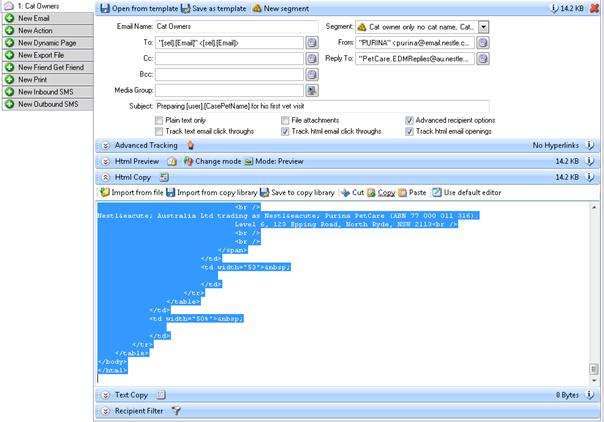
“To:” Field
Click on the “@” icon next to the Tofield. Add the recipient email address by using:
“From:” Field
Click on the “@” icon next to the Fromfield. Add the From email address by using:
Merge Field Address
The physical email address for the recipient(s).
Select from the options available in the Email Address Merge Field by clicking on the down arrow. The most common option is [sel].[Email].
Display Name Merge Field: The text to appear in the “To” field in the recipient(s) email browser. Select from the options available in the Display Name Merge Field by clicking on the down arrow. The most common option is [sel].[Email]. This will display the recipients email address.
When the both of the above fields have been entered, click on the Add Email Address button. This will display the Name and Email Address in the Email Address Selector window. It will also add the information into the To field in the Media window.
Names can be removed by un-ticking the names in the Email Address Selector window.
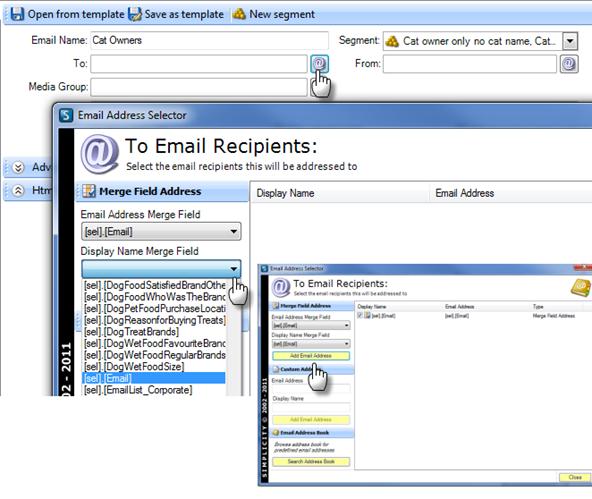
The merge fields should now be displayed in the “To:” field.

Search Address
Click on the ”Search Address Book” button. Click Find in the Email Address Book explorer to return the addresses currently available in the Address Book. You can narrow your search by adding a key word in the Email Address field and/or Display Name field in the explorer. Wildcards “*” can be used in these fields.
Select the required email address and click the Pick button.
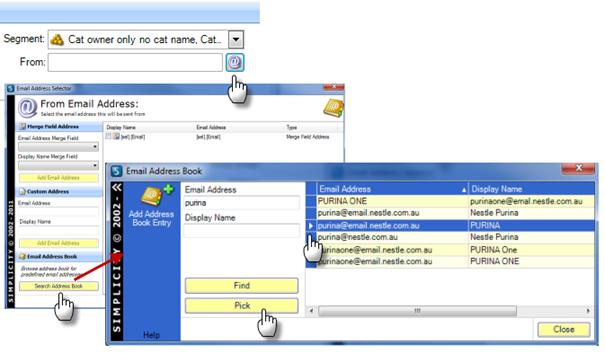
The “from” address should now be displayed in the “From:” field.

Custom Address
Add a custom address if the From: email address is not available in the Address book.
Type in the required email address and display name. Click the Add Email Address button.
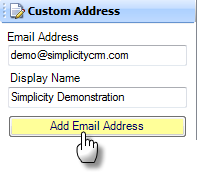
Note: If you are using a custom email address for the “From:” address please check with your account manager that SimplicityCRM has authorisation to send from the domain name you are using.
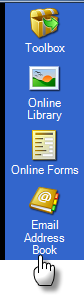
Email Address Book
|
|
Frequently used email addresses can be added to the Email Address book.
Open the Email address book from the left hand toolbar in Campaign workspace.
Also see Search Address Book
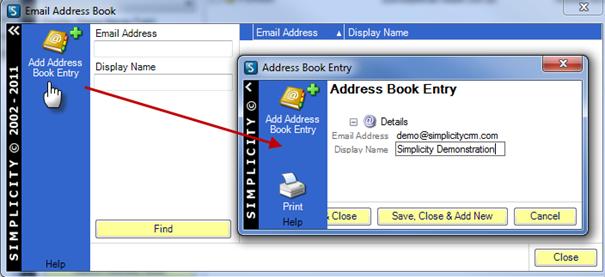
Note: If you are adding a new email address for the “From:” address please check with your account manager that SimplicityCRM has authorisation to send from the domain name you are using.
|
Click on Add Address Book Entry and enter the Email Address and Display Name. Save and Close your new address book entry. Your new email address will now be available to be selected from the Email Address Book. Also see Search Address Book
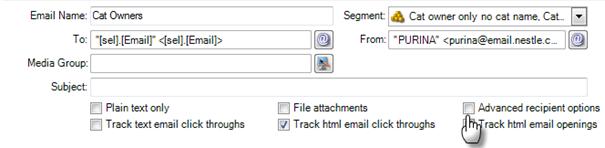
Advanced recipient options
Tick the Advanced recipient options box to activate.
Reply To: Enter the email address where replied emails will go to if the recipient chooses to “Reply” to an email.
Click on the “@” icon next to the “Reply To:” field. Add the Reply To email address by using:

Cc: Carbon Copy. Not recommended for general campaign use.
Bcc: Blind Carbon Copy: Not recommended for general campaign.
Subject Line
Enter the subject line text
Adding the html to the email
Copy the email images into the appropriate Online Library folder.
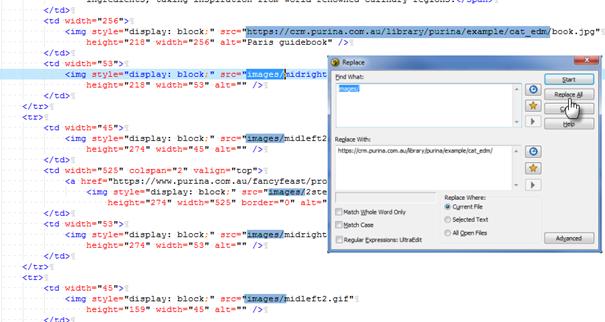
Check the html has the correct source url for the images. All source urls should start with “https://www.simplicitycrm.com/library”. You can replace the image source urls in a text editor prior to adding to the campaign in Simplicity or after it has been added to the campaign. There are no search and replace options in the html editor so it may be easier to complete this process in a text editor.
To add the html to the campaign you can:
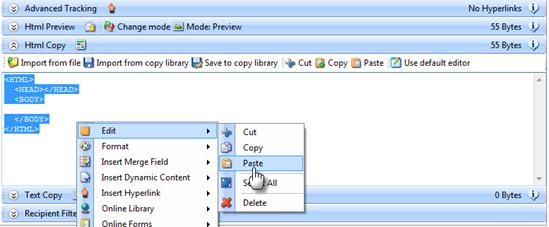
• Copy the html from the source and paste the html into the html copy workspace in the campaign; or
• Drag the html file from the source folder into the campaign.
Copy and Paste html into campaign
1. Copy the source html
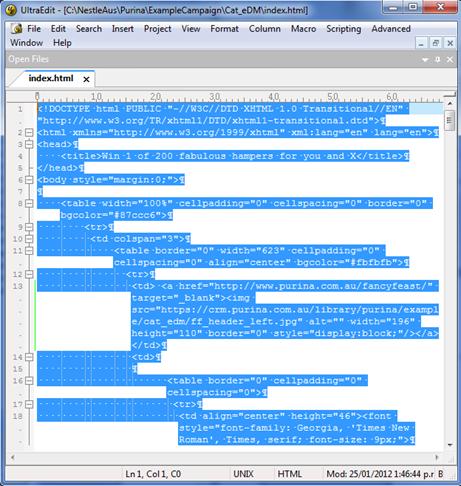
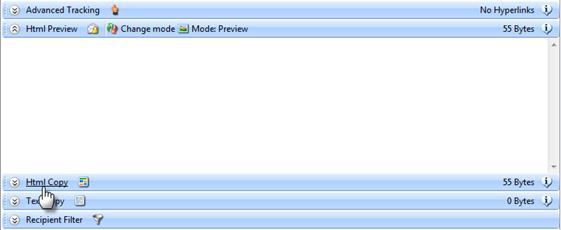
2. Click on “HTML Copy” in the campaign
3. Replace the html code in campaign with the source html
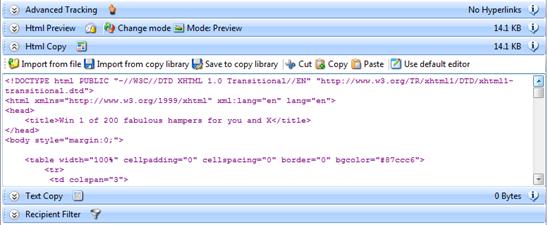
4. Click “HTML Preview” to view the html in the campaign
Drag the html file into the campaign
1. Click on “HTML Copy” in the campaign
2. In Windows Explorer, click on the html file, hold down the mouse button and drag the file into the campaign until the arrow with the plus symbol appears in the campaign. Release the mouse button.
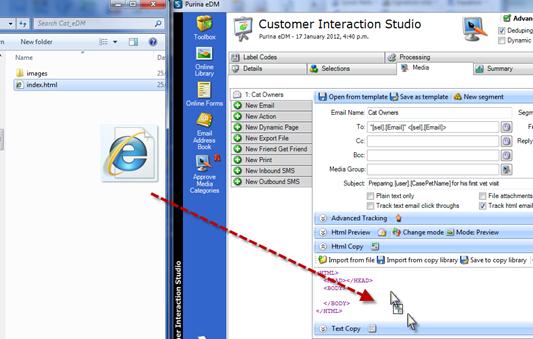
The html will automatically preview in the window.
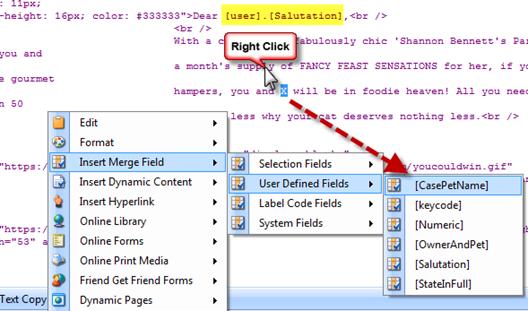
Adding merge fields to the html
Click on “HTML Copy” at the bottom of the html media. Highlight the text, or place the cursor in the html where the merge field is to appear. Right click and hover over “Insert Merge Field” text. Mouse over the required field option (Selection fields or User Defined Fields), then click on the required merge field.
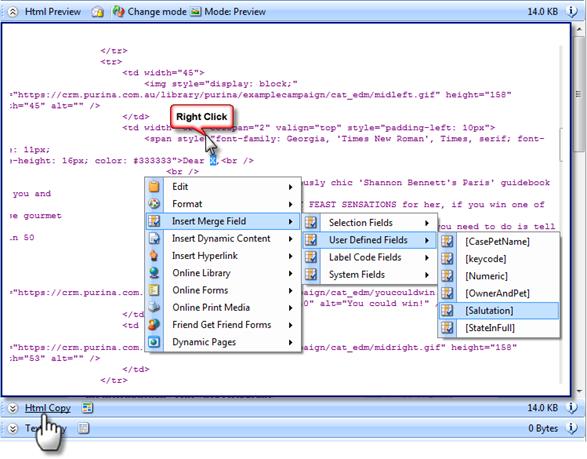
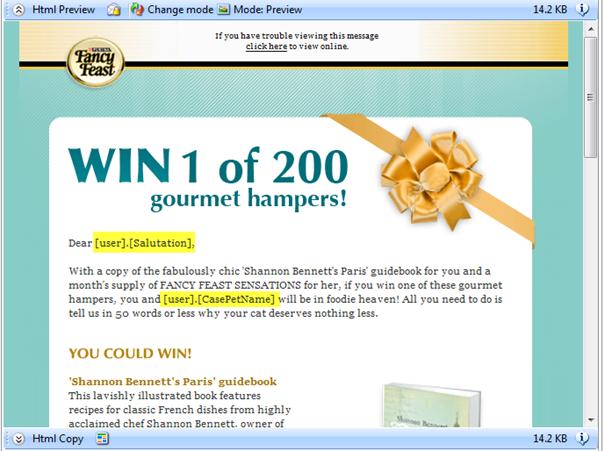
A preview of the html with the merge fields:
Adding a hyperlink from an email to a Simplicity hosted online form
Create a Label Code and add the online form as a response device.
There are two types of Simplicity Forms:
- Standard Online Form — created using the Simplicity Standard Online Form Builder
- Web Service Form — a templated layout using asp.net source code to allow multiple entities (eg, person, one or more pets) in a single survey.
Adding a hyperlink in the html code
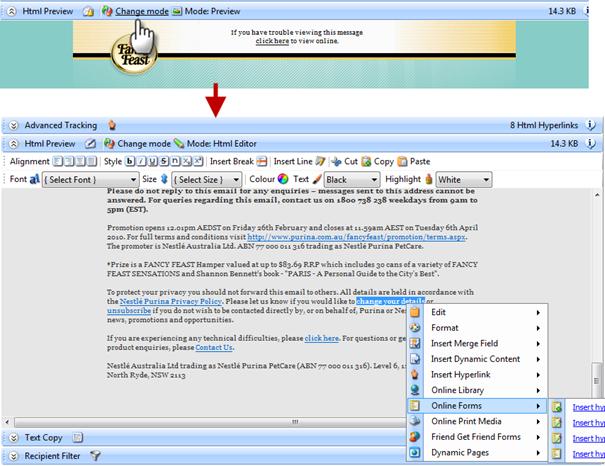
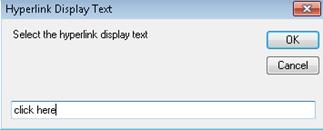
To add a link to a Standard Online Form, highlight the text or image to be hyperlinked. Right click and mouse over “Online Forms” - “Insert hyperlink to online form – Edit existing data only” - select form name.
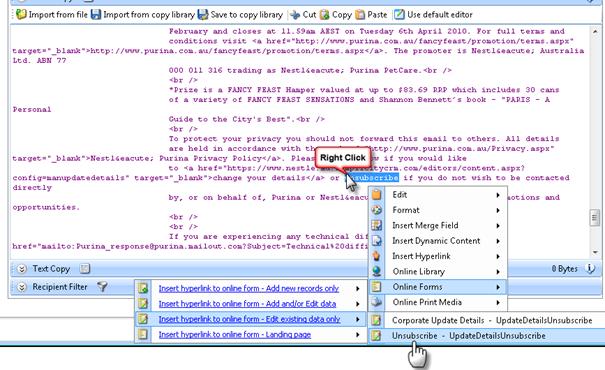
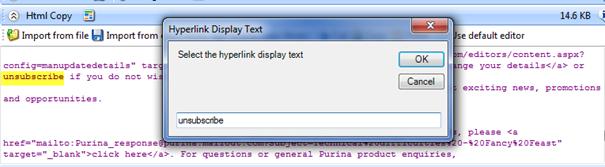
Enter the display text to be hyperlinked. Click “OK”.
The text will now be hyperlinked to the form.
Adding a keycode to the url query string will help with analysis of the survey answers.
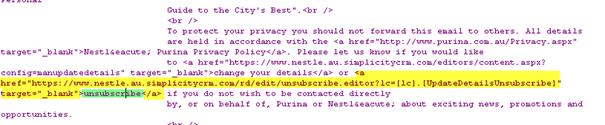
<a href="https://www.{client-code}.{country-code}.simplicitycrm.com/rd/edit/unsubscribe.editor?lc=[lc].[UpdateDetailsUnsubscribe]&kc=Brand_EDM" target="_blank">unsubscribe</a
To add a link to a Web Service Form, highlight the text or image to be hyperlinked. Right click and mouse over “Insert Hyperlink”, click on “Insert text hyperlink”.
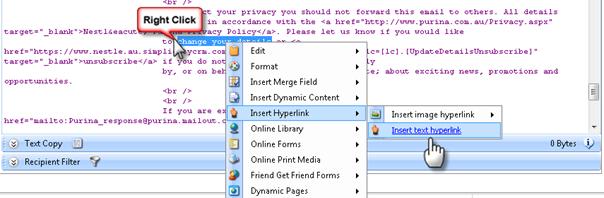
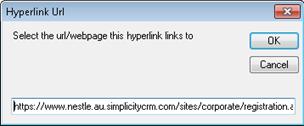
Add the form url, eg, https://www.{client-code}.{country-code}.simplicitycrm.com/sites/corporate/registration.aspx?config=corporateupdatedetails
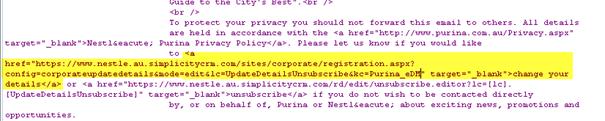
To edit existing records in the data base you will need to add the mode “&mode=edit” and the Label Code “LC=UpdateDetailsUnsubscribe” to the url query string.
A keycode can also be added at this time. eg, https://www.{client-code}.{country-code}.simplicitycrm.com/sites/corporate/registration.aspx?config=corporateupdatedetails&mode=edit&lc=[lc].[UpdateDetailsUnsubscribe]&kc=Brand_eDM
Click OK
Add the Display Text. Click OK

Adding a hyperlink using Change Mode
To add hyperlinks to the media without going into the html code, click on “Change mode” in the html preview. Highlight the text to be hyperlinked and follow the steps in To add a link to a Standard Online Form and To add a link to a Web Service Form.
When you have finished adding the hyperlinks, click Change Mode to preview the html.
Note: Clicking on a url to a Simplicity Form in the Media where mode = edit and the label code is only a merge field will take you to the default page. The label code is created when the campaign is executed. https://www.{client-code}.{country-code}.simplicitycrm.com/editors/content.aspx?config=unsubscribe&lc=[UpdateDetailsUnsubscribe]&kc=[keycode]
Plain text only
The email will be sent out as a text only email. No graphics or formatting will be displayed.
Note: If the plain text only box is checked after entering an html version, the html formatting will be deleted
Creating a text email:
Click on the text copy button at the bottom of the window.
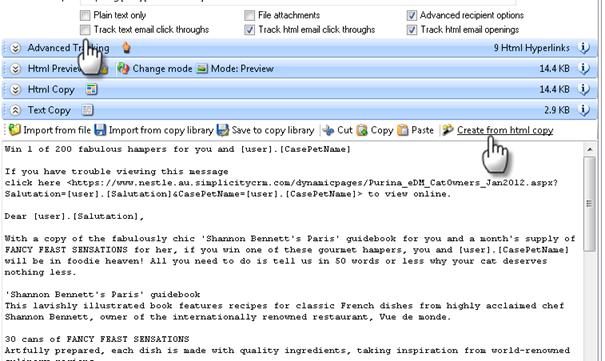
- Option one: Click on the text “Create from html copy”. An exact copy of the html version will be created and displayed appropriately. All hyperlinks and merge field items will also be included.
- Option two: Type or copy and paste text into the text window. To add hyperlinks to Online Forms or include merge fields, following the instructions given previously under Html emails.
Tracking Options
In order to get all links within the HTML tracked by Simplicity and reports able to display click troughs and email opens the tick boxes below need to be ticked:
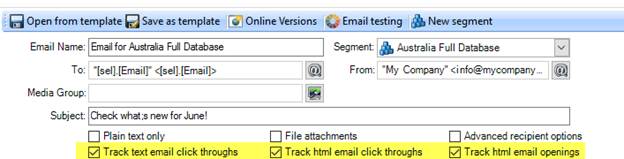
Track hyperlink click throughs: Creates a campaign activity record when a recipient clicks on a hyperlink in an email:
Track email opens: Creates a campaign activity record when a recipient has opened an email.
Note: both of these options are only available for html email recipients only.
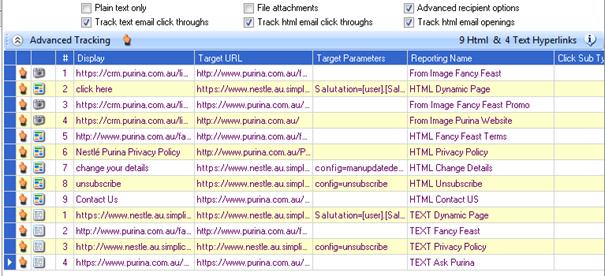
Advanced Tracking
All Simplicity reports display the Target URL for the click through tracking counts. The Target URL does not include the query string (Target Parameters).
A “reporting name” can be added to all hyperlinks. The reporting name, instead of the url, will be displayed in the campaign analysis report.
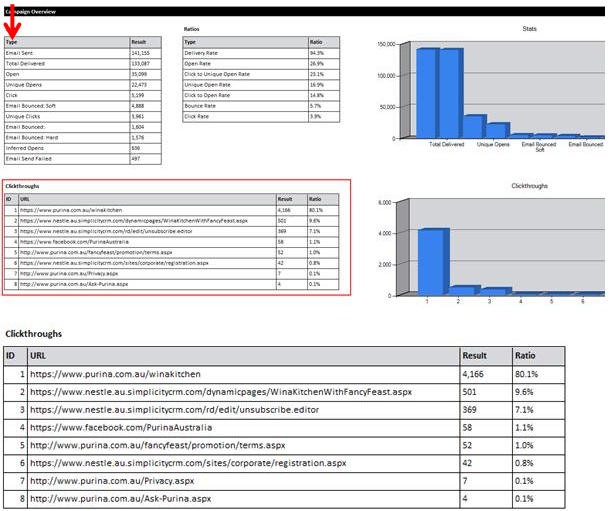
Extract from Brand Report where no report names have been added in the advanced tracking:
To add a Reporting Name click on Advanced Tracking in the Email media.
Click in the Reporting Name column. Enter the name to be displayed in the Report. TAB off the Reporting Name field. Repeat this process for all the url rows.
 |
Image is hyperlinked
|
 |
Text is hyperlinked in html
|
 |
Hyperlink is in text version
|
Note: For click through tracking to work in the text version all hyperlinks must start with http://
Advanced tracking added to track Text Version click throughs:
Extract from resulting campaign report:
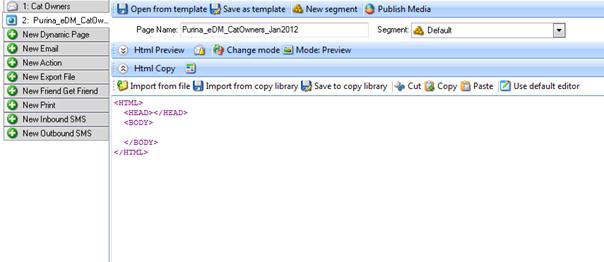
New Dynamic Page (online version of email)
Simplicity “Dynamic Pages” are often also referred to as “Online Newsletters” or “Online Pages”, personalisation and unique codes are passed dynamically from the email hyperlink to the web page.
One of the advantages with Simplicity Dynamic Pages over some traditional pages is that they not only give you an equivalent online creative representation of your email but they also cater for the following:
- Merged content from your data sources.
- Merged content from your user defined fields. (as previously covered)
- Merged content from “Dynamic Content” during the execution process. (as previously covered)
- Varying content across all the above for each and every segment.
- Automatically generate “Online” and “Share” versions generated from your email assets.
These options allow through one simple online template a truly personalised online representation that may different for each and every recipient in your EDM.
The following will walk you through the dynamic page creation process and options available.
Creating a Dynamic Page
Add a unique Page Name in the New Dynamic Page workspace. It is recommended that you do not use spaces in the naming conventions. Use hyphens (-) or underscorces (_) to separate words.
In the Email Media view the html copy. Select all the html code and copy.
In the Dynamic Page media, view the html copy. Delete the existing code and paste the copied html code from the Email media into the Dynamic Page Html Copy.
Delete the text referring to viewing the email online.
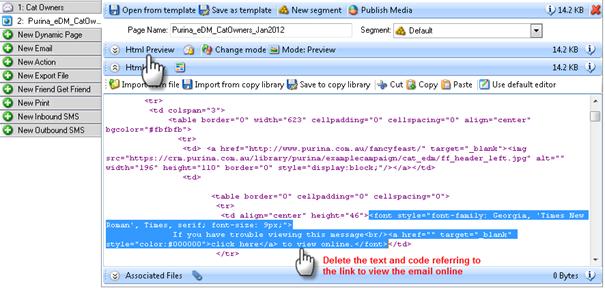
Click on Html Preview to preview the dynamic page in the Customer Interaction Studio.
Save the campaign changes. Click on Publish Media.
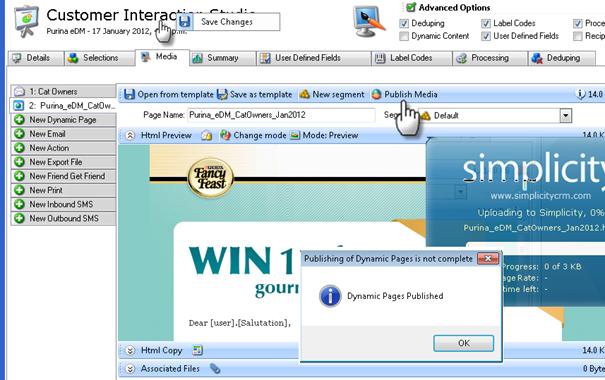
Click OK when the Dynamic Page is Published.
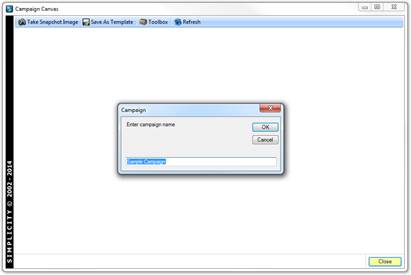
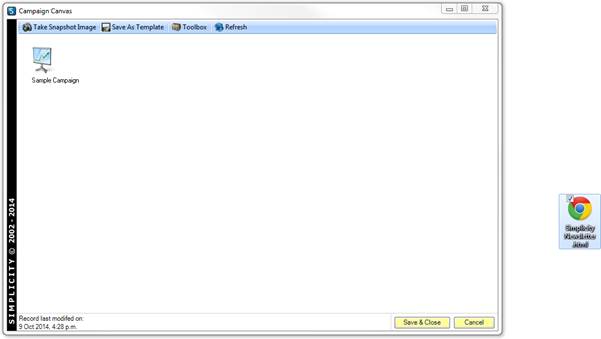
Simple creation through “Simplicity Canvas”
Open a new Simplicity Canvas through the “New Campaign” button on the Campaign Menu.
Enter your campaign name here.
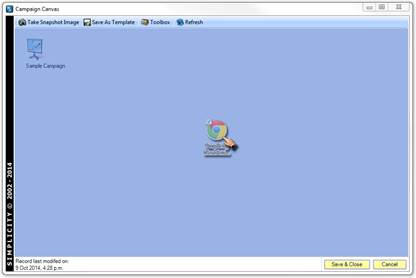
Simply drag in your email creative asset onto the canvas.
Images resources within the template are then automatically uploaded to the online library and the image references re-pointed to the uploaded image references.
This helps to ensure no images in your creative assets are only accessible from your local computer or corporate lan.

The email asset is also now checked for any merge fields and prompts for default text to use for the public sharing version. This caters for the scenario where your email my say “Dear Geoff” but the version when shared with “The World” via social media would read “Dear Motor Enthusiast” or whichever default text was supplied.
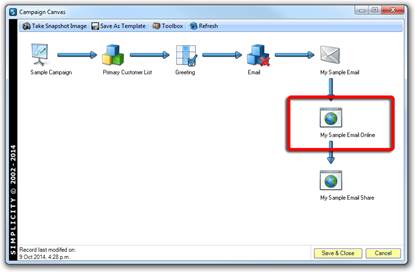
The automatically created online version still retains the personalisation so the “click here” to view online link would present the recipient with an online personalised version.
Simple creation through “Email Media”
On the “Email Media” tab for any email asset you wish to create online versions all you need to do is click on the “Online Versions” button to create your “Online” and “Share” dynamic pages.
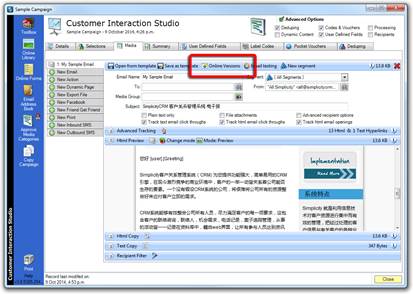
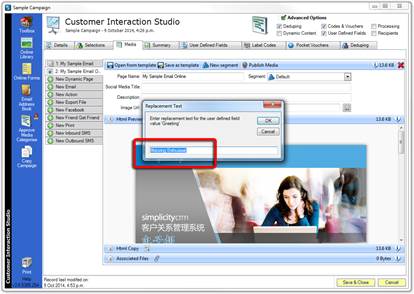
Shown below is a merge field in the email asset that will prompt us for default copy for the share version when we click to create.
Simply supply the desired default text.
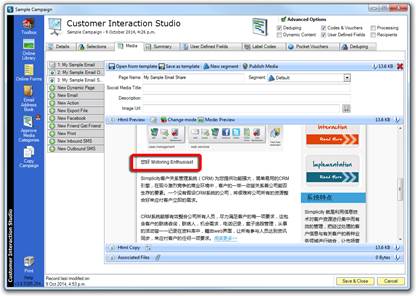
Now on the share version you can see your default text has been inserted.
If we now go back and look at the automatic amendments that have been made to our email asset we can see that it has inserted the “click here” link automatically to view online.
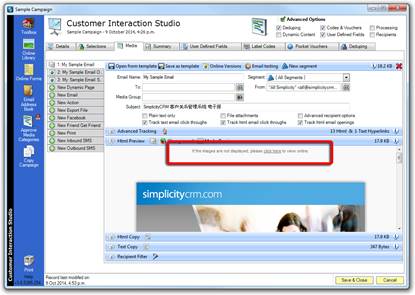
And the corresponding “Share” links also inserted automatically at the bottom of the email asset.
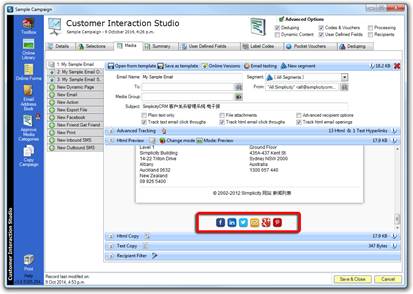
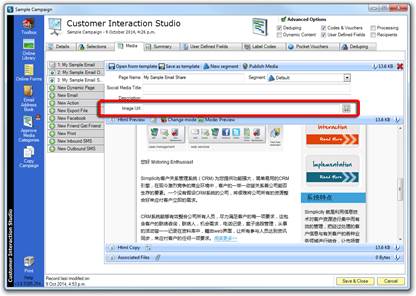
Dynamic Page – Share Attributes
As most social media services display additional attributes automatically for any links shared these attributes that the social media sites query from your page can be easily defined so your pages is always the best representation of your brand.
Not all social media services use all the attributes below but all the main players make use of these.
Social Media Title

Social Media Description
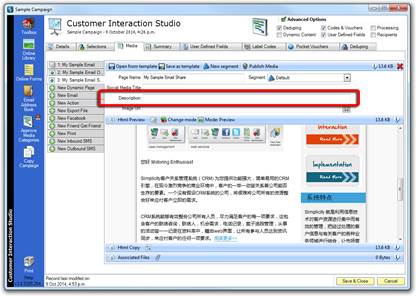
Social Media Image
Adding the dynamic page hyperlink to the html media
Also see, Adding a hyperlink using Change Mode
Go back to the Email media. View the html copy and highlight the text to be hyperlinked. Right click and mouse over Dynamic Pages, click on the Dynamic page name.
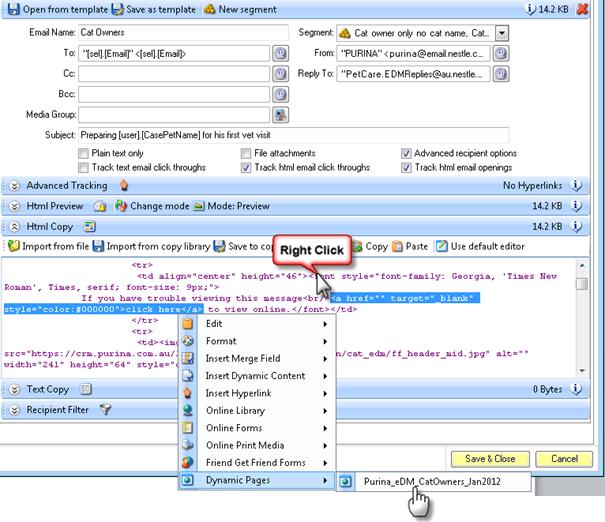
Type in the Display Text for the hyperlink. Click OK.
The display text and hyperlink will now be displayed in the html.
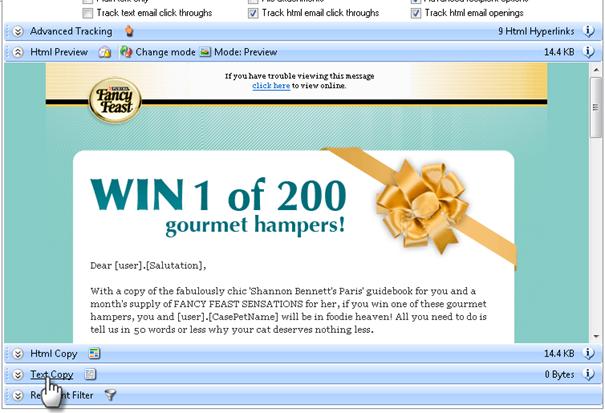
If you have trouble viewing this message<br/><a href="https://www.{client-code}.{country-code}.simplicitycrm.com/dynamicpages/eDM_CatOwners_Jan2012.aspx?Salutation=[user].[Salutation]&CasePetName=[user].[CasePetName]" target="_blank">click here</a> to view online.
Text Version
Creating a text version from the html
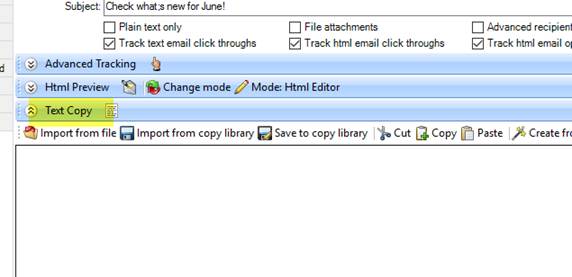
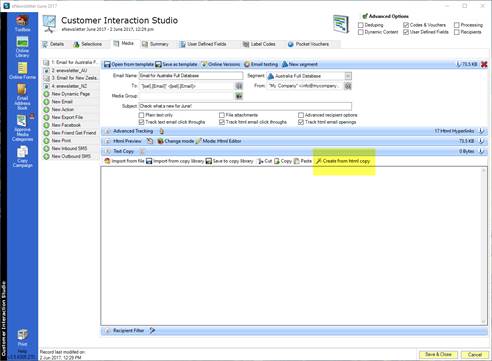
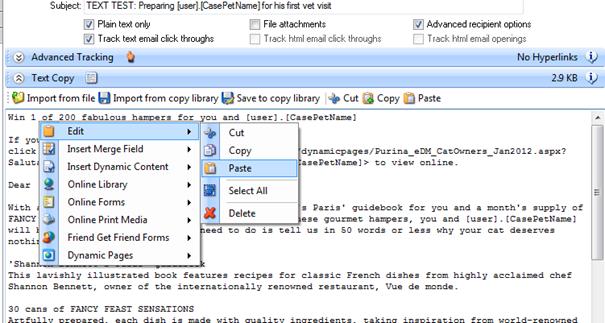
In the Email Media click on Text Copy.
Click on Create from html copy. Turn on the Track text email click throughs if you require reporting for the text version.
Create from html copy does not translate images or hyperlinks around the images so you will need to check the text version.
If a supplied text version is available, copy and paste the text version into the Text Copy window instead of clicking “Create from html copy”.
Note: The recipients mail box will determine what version of the email it accepts.
Creating a TEST Text Version
To create a text version of the email for testing purposes add a New Email media. Add the Email Name, the subject line and select the “To” and “From” email fields by clicking on the @ icon.
Tick the “Plain text only” and “Track text email click throughs” options below the subject line.
Note: Do not tick “Plain text only” in the html email version. This will remove the html code — un-ticking the box will not return the html code.

Copy the Text copy into the Text Copy workspace.
The Text Version is now ready for a Test Send.
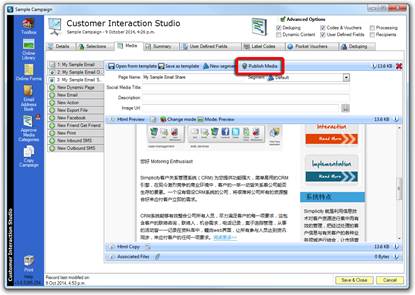
Dynamic Page – Publishing
Simplicity dynamic pages are automatically published as part of the campaign execution process but where you wish to use the page outside of executing a campaign this can be simply published by clicking on the “Publish Media” button as shown.
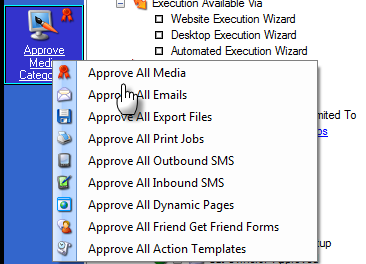
Approve Media Categories
All media must be approved before executing or processing a campaign.
To approve all media in the campaign click on the icon “Approve Media Categories” and click ”Approve All Media”