Dynamic Content
Dynamic content allows for editable and non‐editable content choices to be presented during the campaign execution process.
This can be anything from selecting a series of pre‐determined options, to simple paragraph or subject line changes through to more flexible HTML editing during the execution process.
It also has spell checking and profanity services to ensure that correspondence that goes out appropriately represents your brands.
The following walk through is an example of a product selection / advertisments being presented within an email during the campaign execution process.
There are many and varied configuration options available for dynamic content choices but today we will walk through an introductory example to give you a good basis for incorporating dynamic content in other campaigns.
Sample Scenario
This examples works through a campaign that has been setup to thank customers involvement at a recent event and has three product offerings that have been setup to be optionally including when executing the campaign.
We will brush over the general campaign setup through this example and focus on the dynamic content areas of campaign setup.
This example uses a creative email asset that has been supplied from either a digital agency or internal creative team.
When you have these assets designed it pays to have either the agency or someone who can read HMTL insert markers or “comment tags” where merge content starts and finishes within your email.
This will assist in ensuring that during the setup process of the email template that we don’t end up with any malformed HTML.
Samples of what these tags could look like are illustrated below.
****************insert code*************
The sections which are often good candidates for dynamic content as highlighted above are now illustrated visually below.
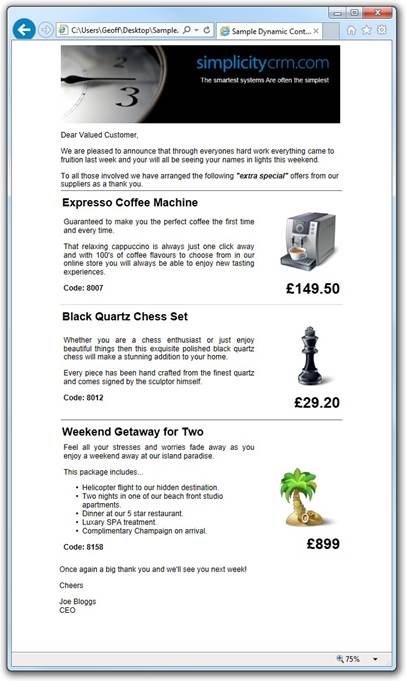
Top Banners

Introduction / Welcome
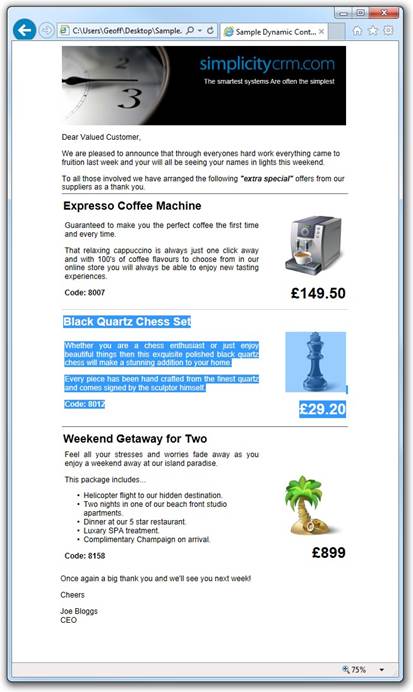
Story Content 1 / 3


We can see in this example only a portion of the content has been selected to ensure during execution only the descriptive text and not what the package includes can be customised.

Now that we have looked at what sections are commonly used lets work through what is required in setting up dynamic content.
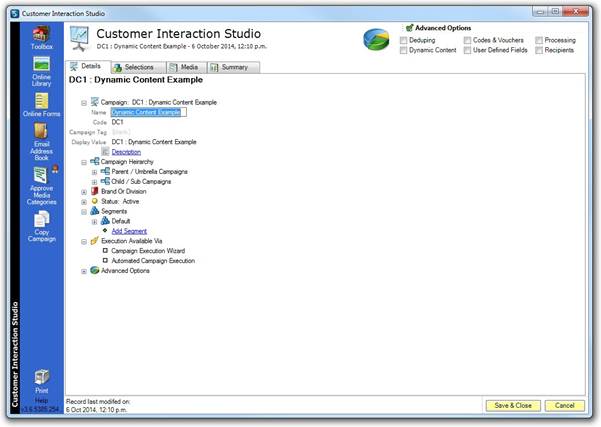
First let’s create a new campaign called “Dynamic Content Example”.
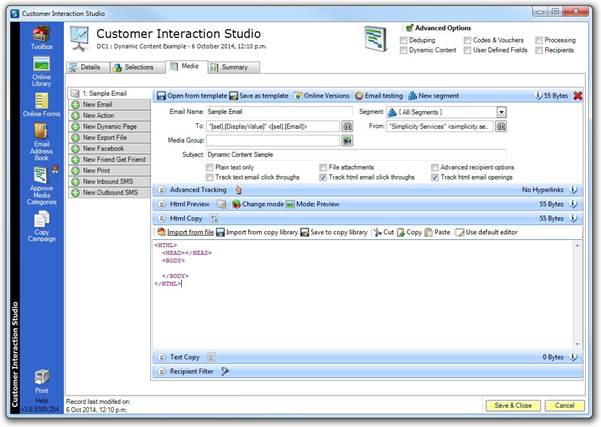
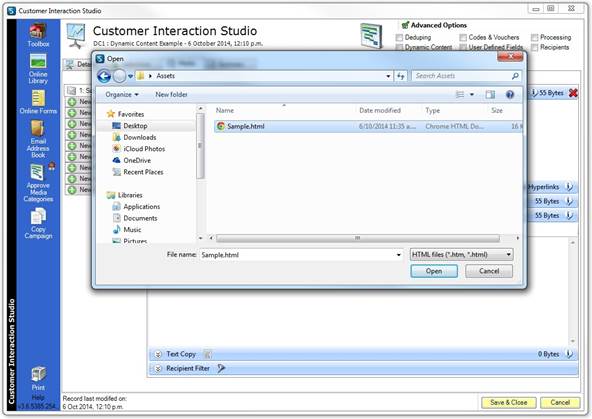
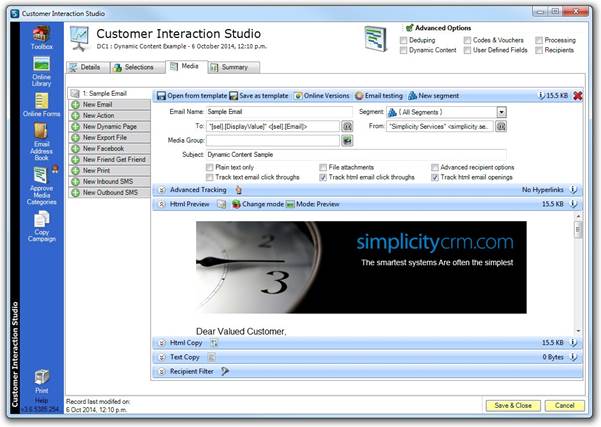
Now click on “Import from file”
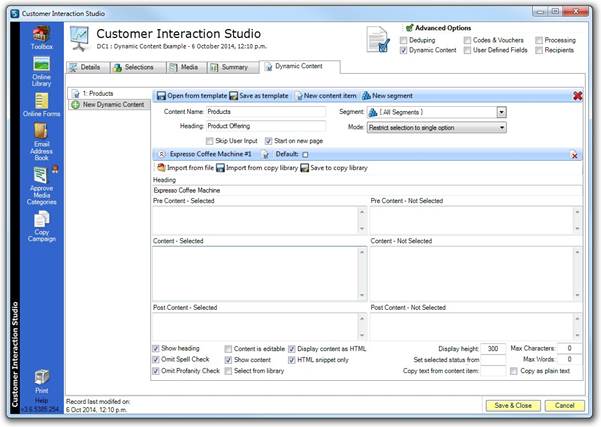
Now we can add our “Dynamic Content”. To get the option to add new dynamic content items click the appropriate checkbox “Dynamic Content” in the top right corner.
You will now see a screen as below.
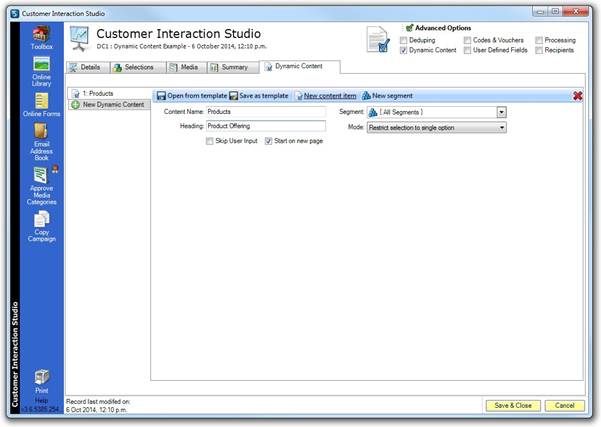
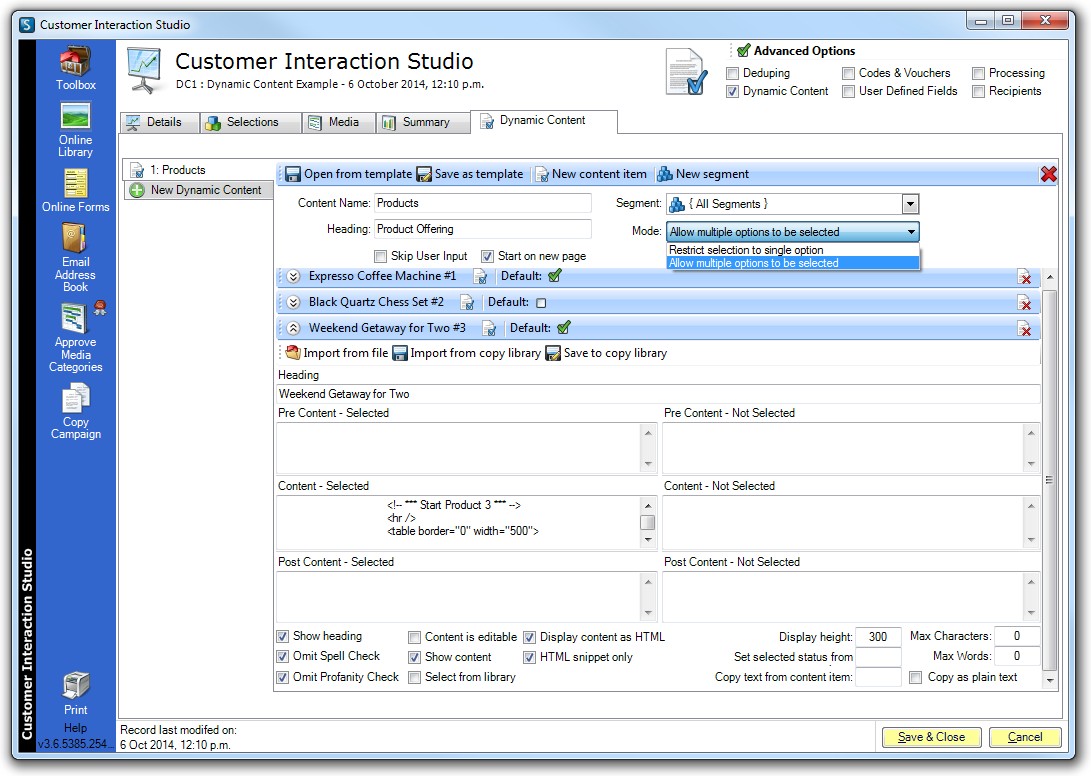
Give your dynamic content a name and click the button “New content item”
You will see a new dynamic content items appear as below.
We are now going to walk through each of the dynamic content options.
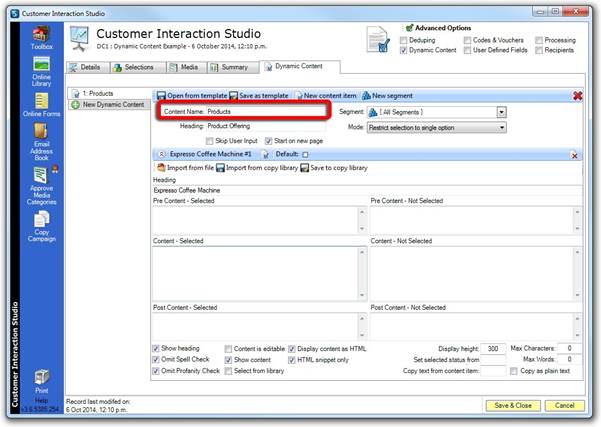
Content Name
This is the name of your dynamic content. It also the name that is used for your dynamic content merge fields that will be inserted into the email media at a later stage.
It is important to note that whenever possible only simple text names should be used here.
Introducing symbols and multiple spaces can create merge fields that are difficult to work with where visually variations may appear quite similar. E.g. One space verses two or three will look almost the same.
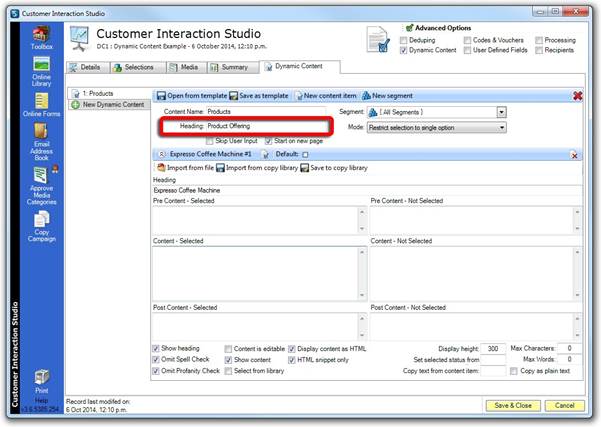
Heading
This is the heading that will be used for the options you configure when it is presented to the user executing the campaign.
Mode
This donates whether the user can select one or many of the options that are going to be presented.
In our example we will have three different specials that will be presented to the user so we will be allowing multi items to be selected.

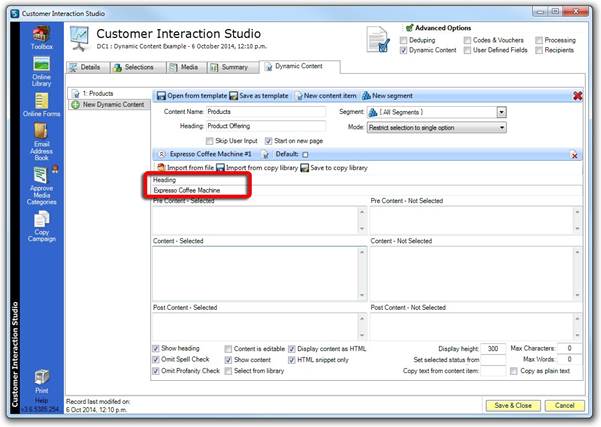
Item Heading
This is the heading for this individual option.
Default Value
This is the content that is going to be selected by default when this option is selected.

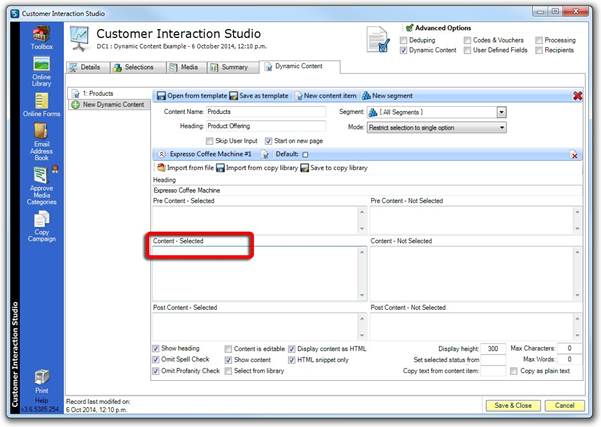
Selected Content
This is the content that is going to be used for when this option is selected. It also supplies the default text or html for editing when “Content is editable” is chosen.
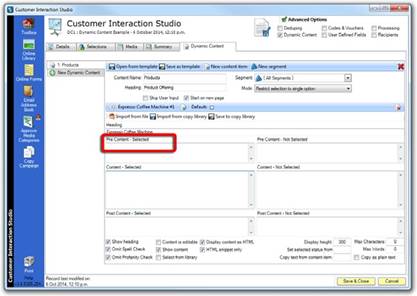
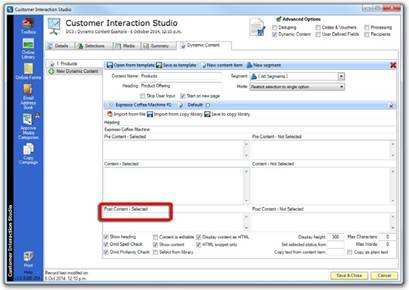
Pre‐Content and Post‐Content
Pre and post content are primarily used to allow for formatting (E.g. FONT) or structure enforcing (E.g. TABLE) tags that are required to be put around the content the user is providing.
Typically this includes font styling, colouring and table row or table cell constructs. This leaves the user with simple text to enter when editing dynamic content.
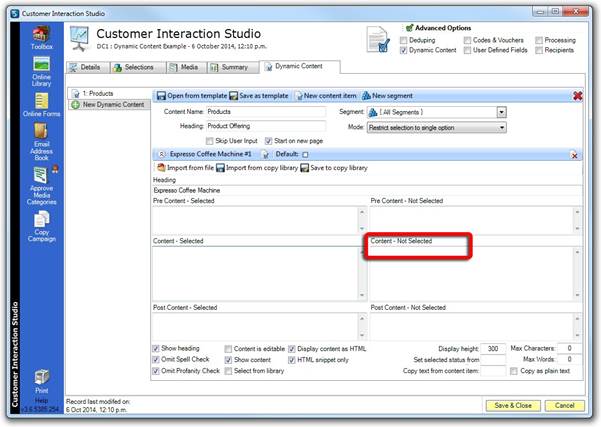
Content – Not Selected
This is an option that seems strange at a first glance but is very important part to play in keep a good well‐structured HTML email.
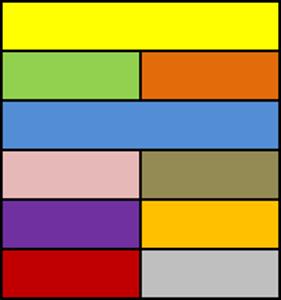
HTML Building Blocks
If we break HTML down it is based a framework of shapes that typically flow together. The HTML blocks as illustrated by the colour sections below illustrate where the “Content – Not Selected” options add value.
Below is our starting HTML email
If we didn’t have the option to have not selected blocks then the following may occur.
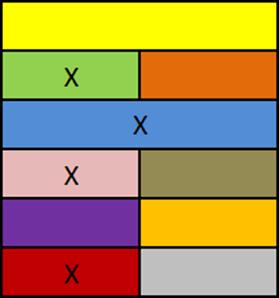
The blocks that we haven’t selected to be included in this email as part of our dynamic content selections are highlighted with “X” as above and below.
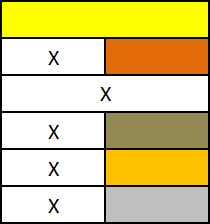
You can see how the missing blocks result in the remaining blocks shifting as illustrated.
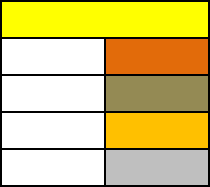
Finally ending up with the HTML as below.
This may be the desired behaviour but often you will have particular look and feel you may want to maintain. As illustrated blocks of HTML may even transition unexpectedly from side of your email to the other.
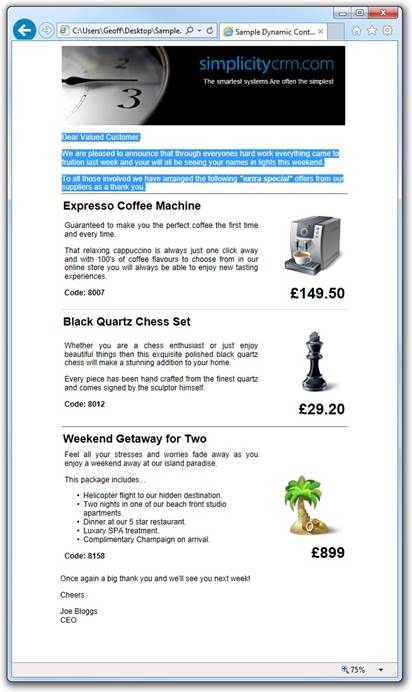
Scenario 2 with “Not Selected” options included.
So with the same starting blocks we will observe the differing result these blocks now have.

So we will be removing the same options as in our first scenario.
But in this case we can see they have been replaced with the “Not‐Selected” content items to retain the same shape and form to our HTML email.

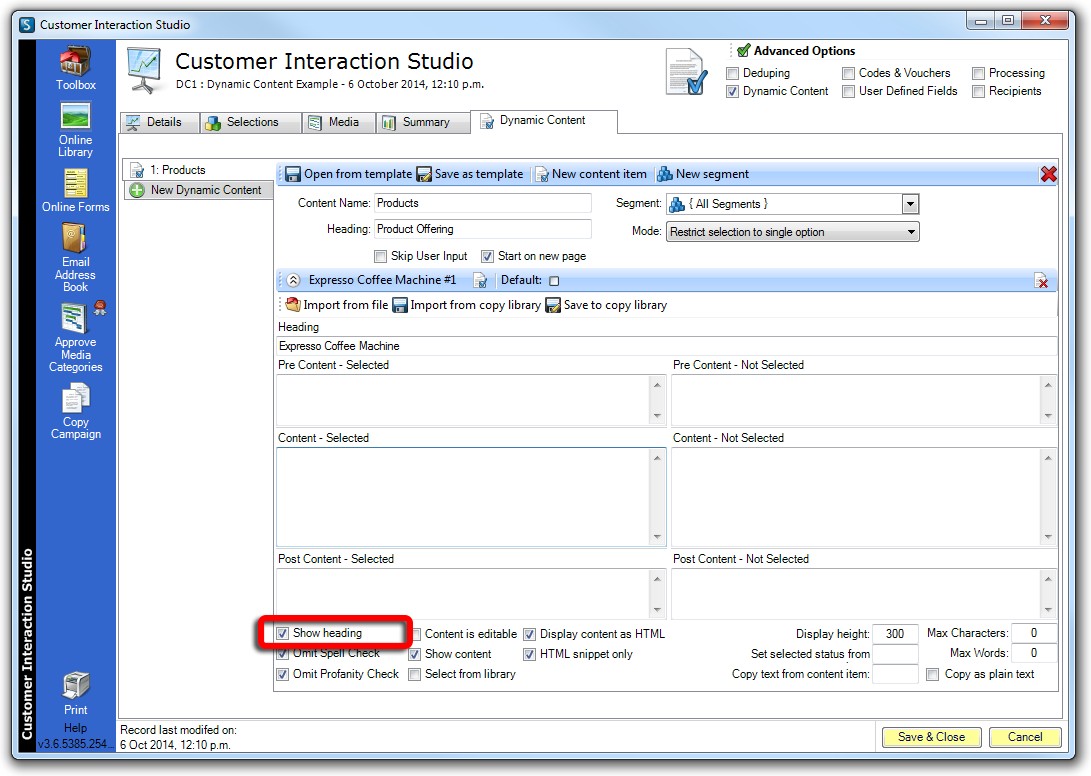
Show Heading
This omits the heading from the dynamic content choices presented. You may want to do this where the heading reads the same as the page title or other nearby copy that makes the heading look repeated. The content itself may even have a heading within it.
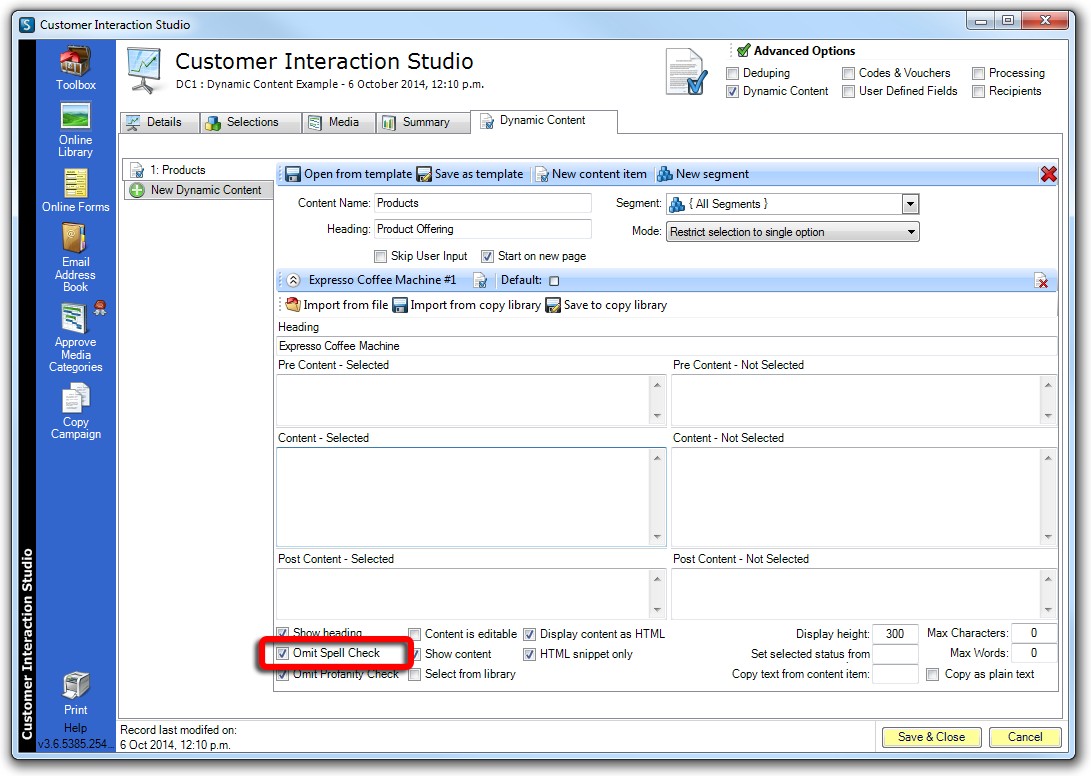
Omit Spell Check
This applies when the content being presented is editable.
Selecting this box disables the spell checking for this item. You may wish to do this if there are a number of text fields that don’t make real words. Product codes are good examples where they would be found in a dictionary.
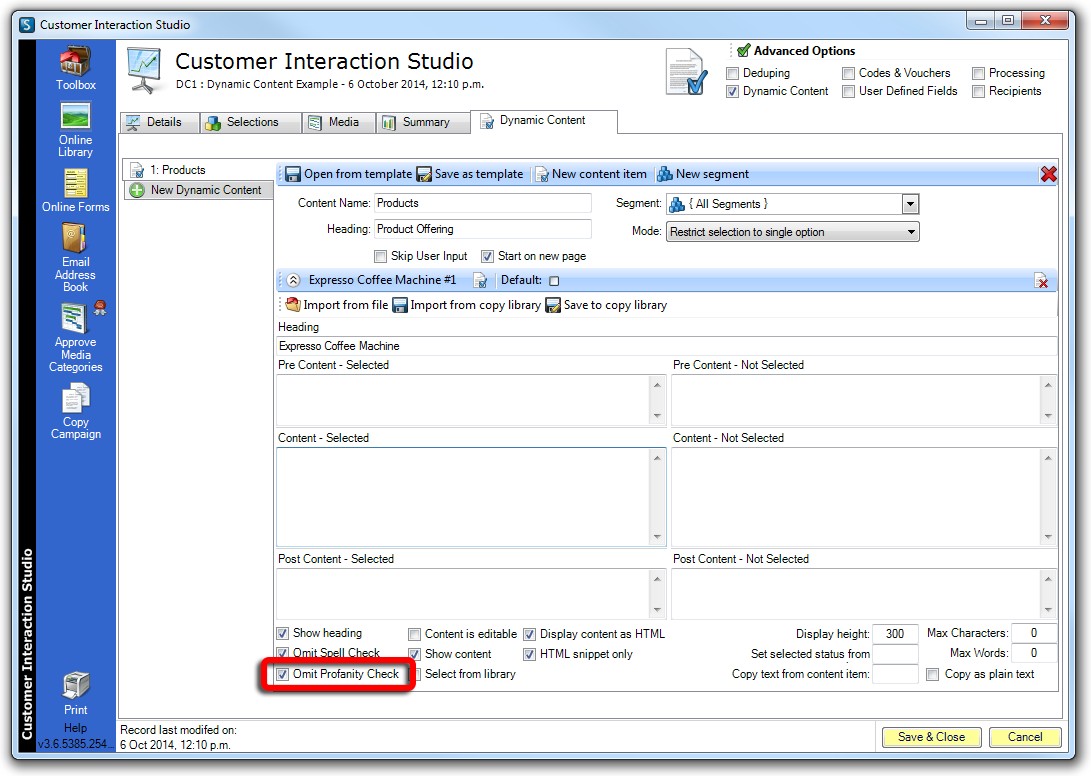
Omit Profanity Check
This would usually not be disabled as it is important with all correspondence representing your brands that all correspondence is professional and appropriate.
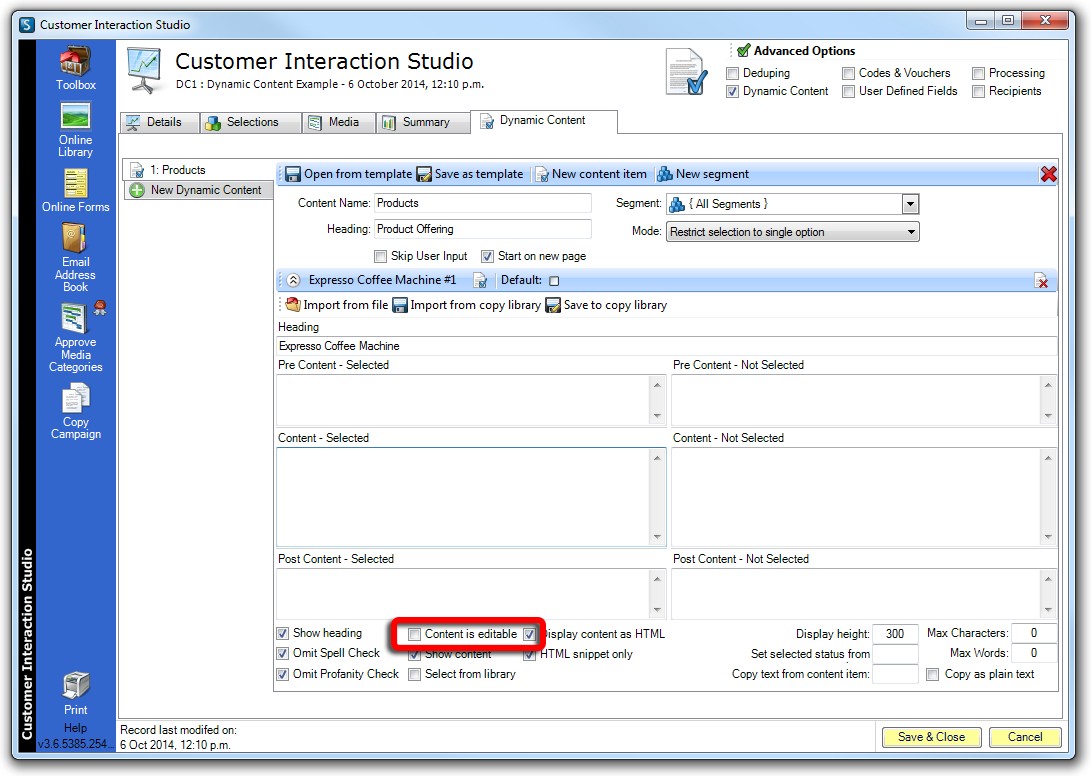
Content is Editable
Just like it sounds this changes the content from an item you are just selecting like from a predefined menu to one that you can edit and alter during the execution process.
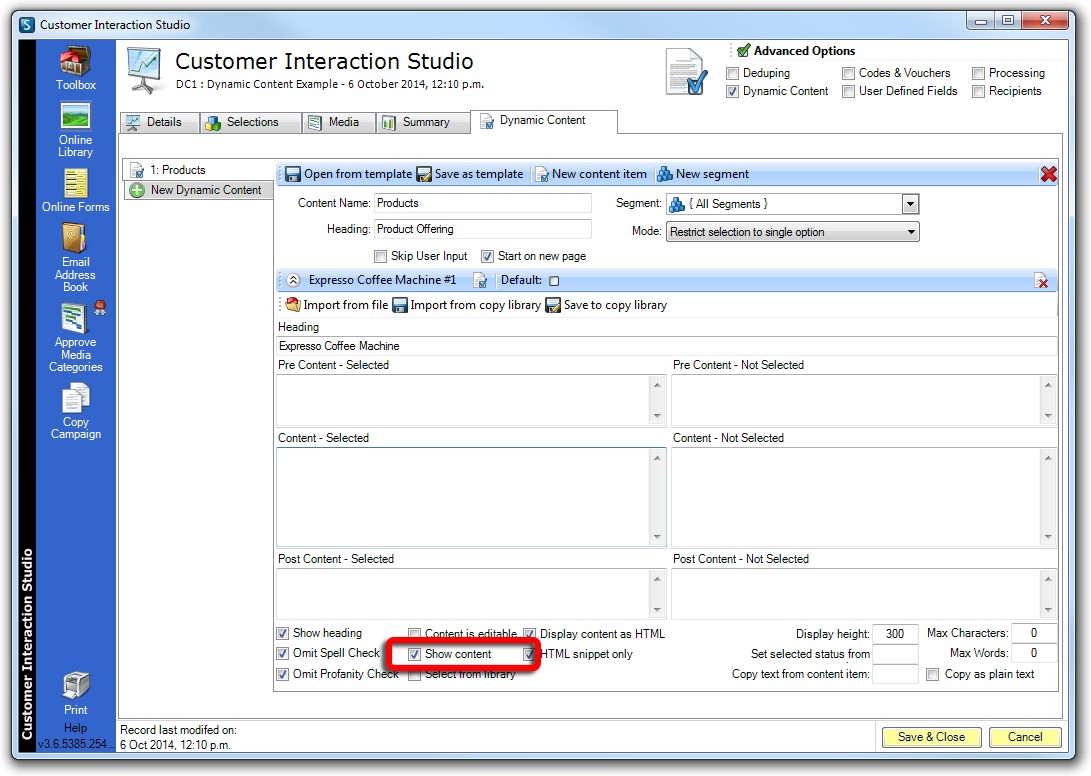
Show Content
So why would I not show content?
Content can be set from other sources other than through the execution wizard. In which case you may not be presenting these options during the execution process but would be producing the merged content in the HTML email produced. Other example would be when you are setting this content from an option supplied earlier in the execution wizard and are not wanting to prompt the user for the same information the second time. You may have multiple emails under two different brands that you are want to include the identical copy it or a textual representation.
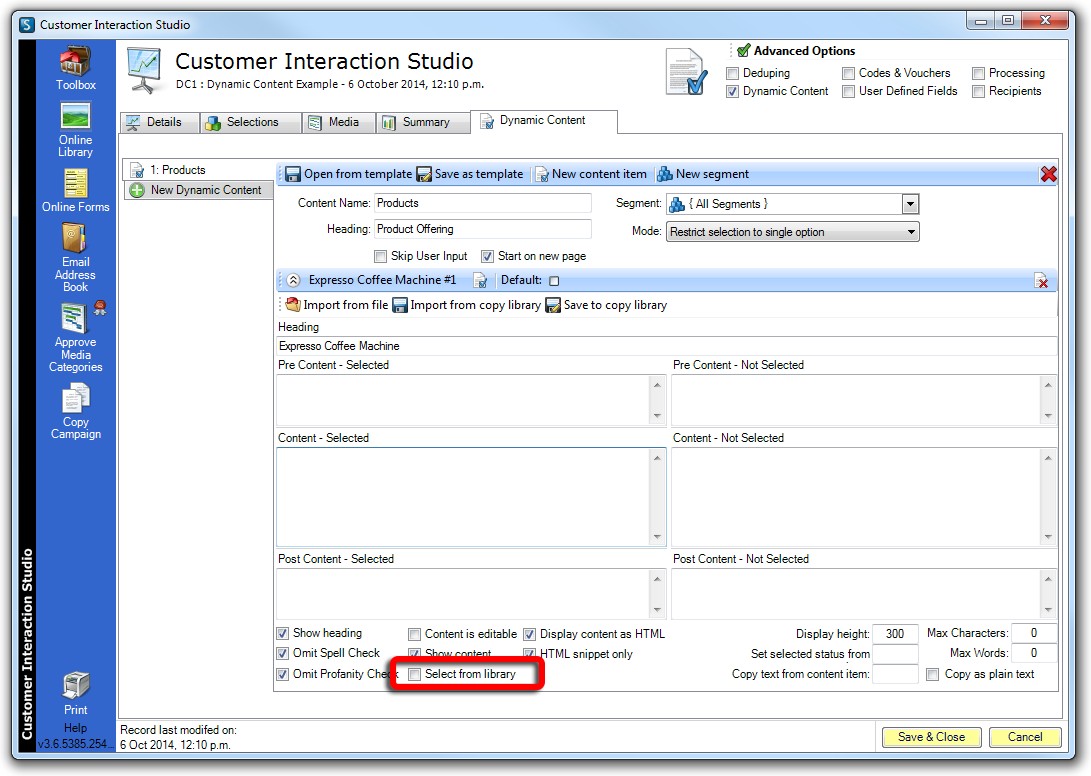
Select from Library
This allows for online assets to be included during the execution process. Often this is used for changing banners or product and event photo’s.
Display Content as HTML
This determines whether editable or non‐editable content should be rendered as plain text or HTML.

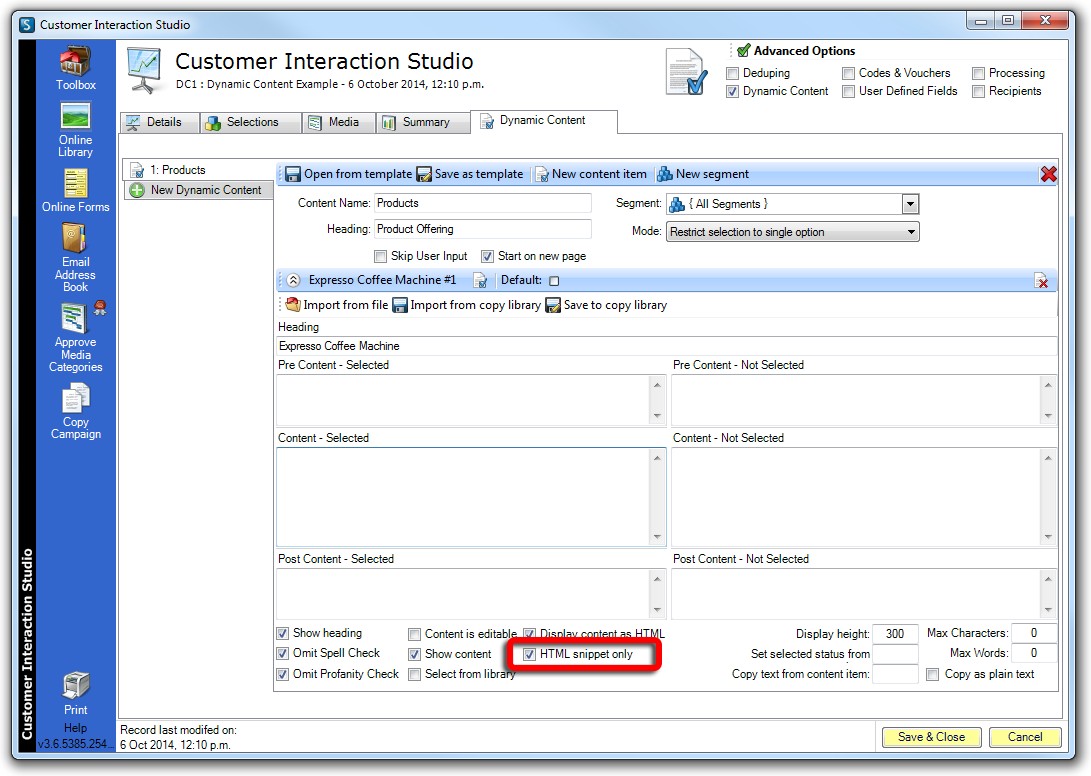
HTML Snippet Only
This determines whether content supplied should automatically supply the surround HTML tags to balance the HTML entered or whether this is just a snippet of a large HTML document. HTML snippet would be used in nearly all scenarios.
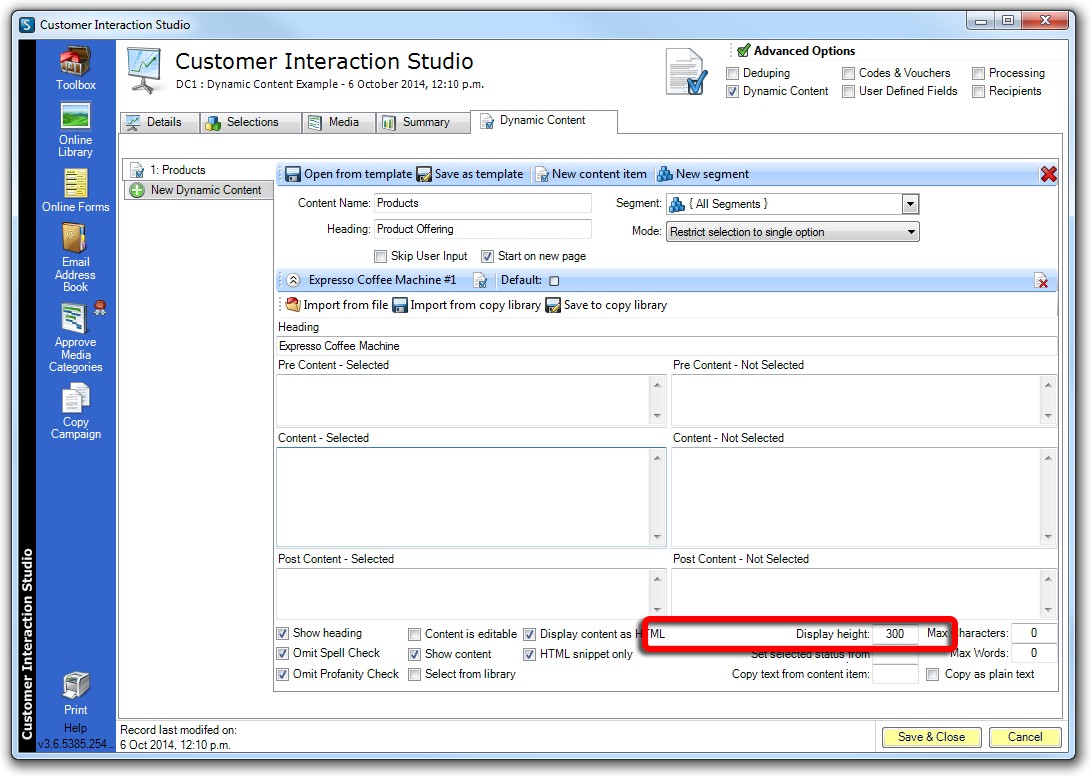
Display Height.
When content options are displayed this determines the display height of the content items.
If the contained content is larger than the size supplied scrollbars will appear on the content item. This ensures there is appropriate space to visually display the content correctly and also prevents the very large content items from forcing other options visually off the page.
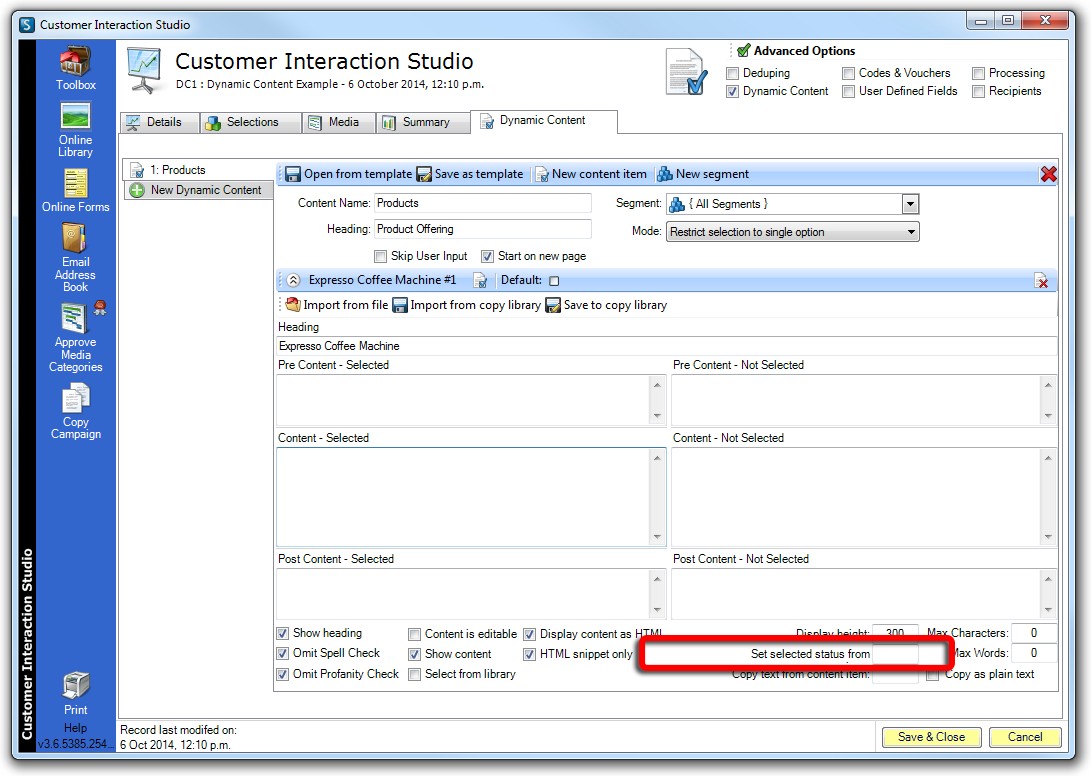
Set selected status from
This will set the default selected status from the selected status of a previous item.
An example of this would be to have option 2 selected for the HTML version then there is a good chance for the TEXT version of the email you would want the same option chosen but not have to have the user executing the campaign make the same choice a second time.
Copy text from content item.
This is commonly used to get the default text version of an email.
It is typically used in conjunction with the “Copy as plain text” checkbox.
When HTML content is edited say for an opening paragraph then the text version you will want read the same but without all the HTML tags for font sizes, colouring, table structures, image tags, etc.
This allows for it to automatically create an excellent starting point for copy for your TEXT version whilst still allowing for previewing and further editing of the automatically generated copy.

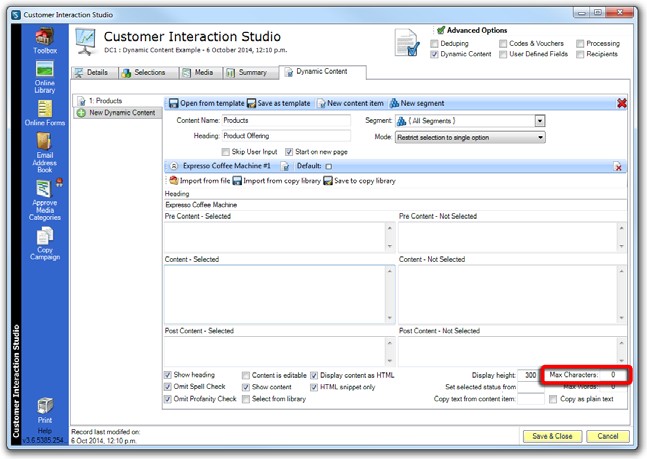
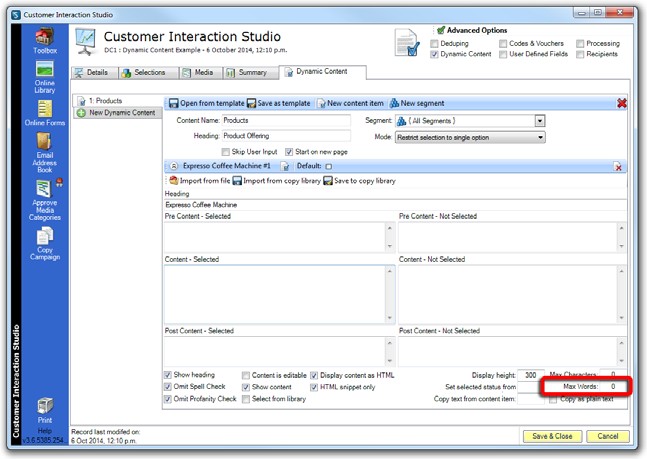
Max characters and Max words
These two options are exactly as they sound and apply to editable content.
Example Continued…
Now back to our example. Copy each of the HTML blocks within our sample asset.
This where having the predefined tags makes it simple to know where to start and end your selections.
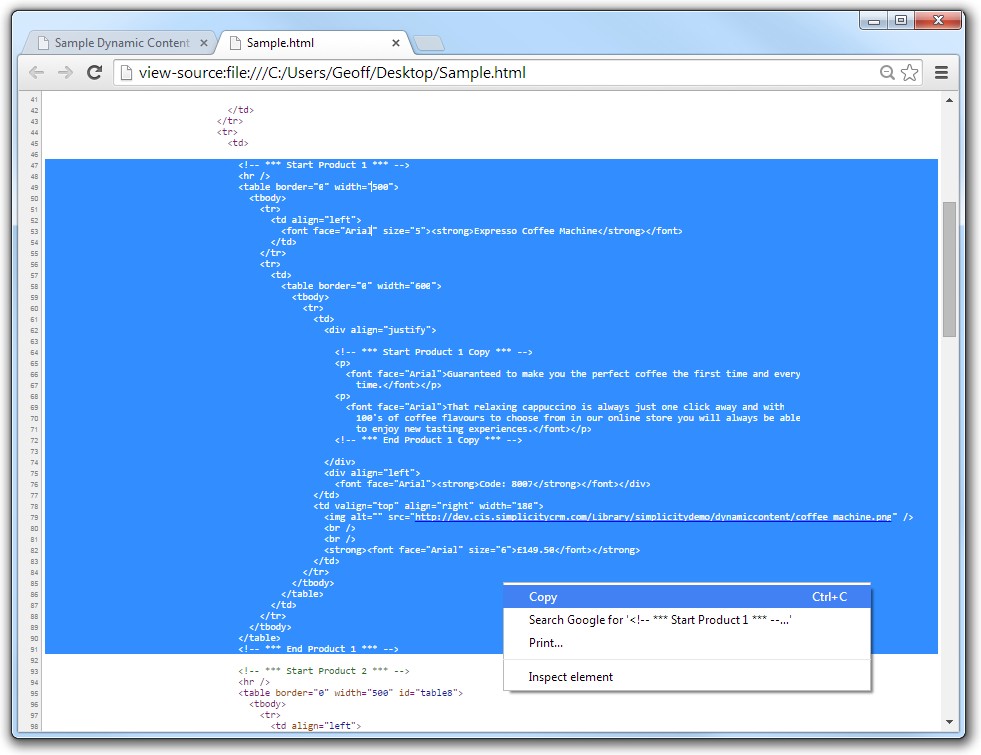
These will be copied into the “Content – Selected” input boxes on each of the dynamic content options we are setting up.
In our example we now have the following three choices setup.
- Expresso Coffee Machine
- Black Quartz Chess Set
- Weekend Getaway for Two
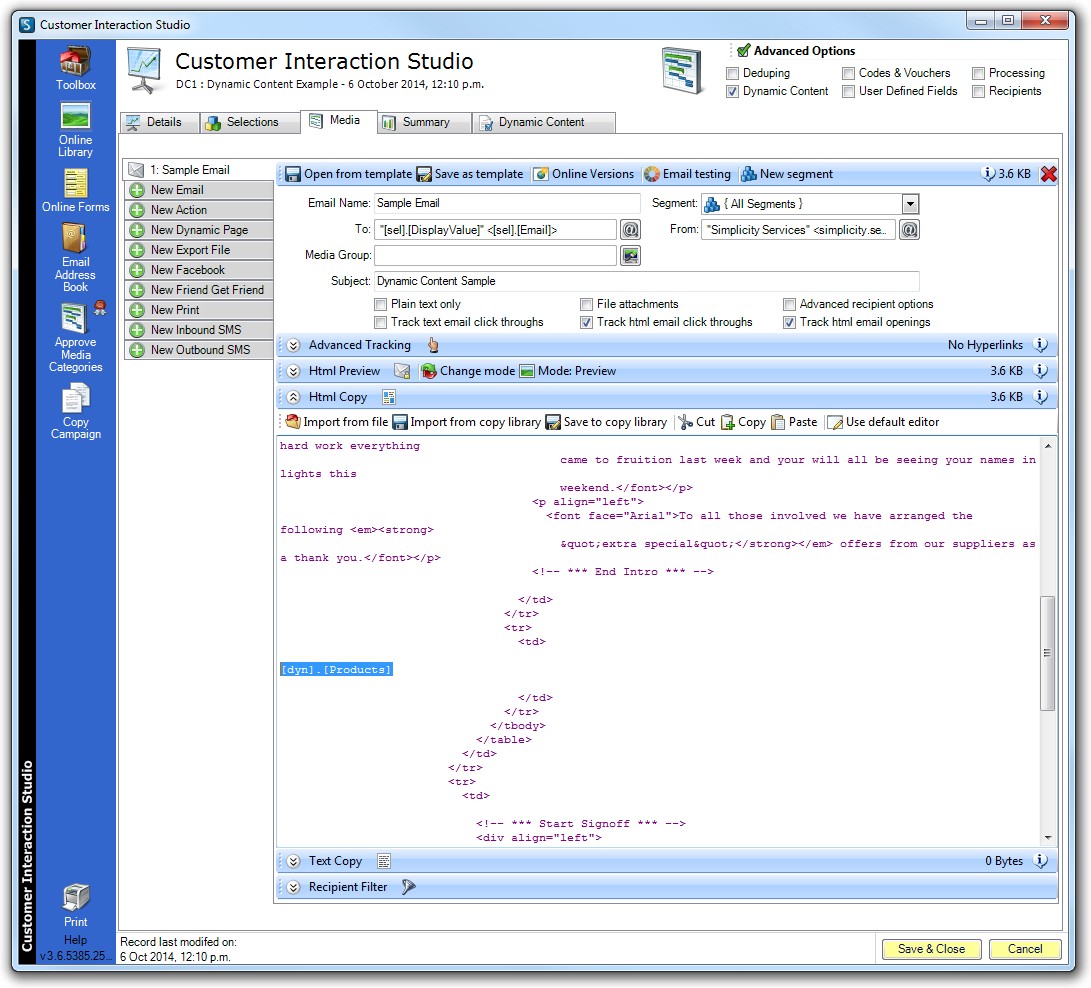
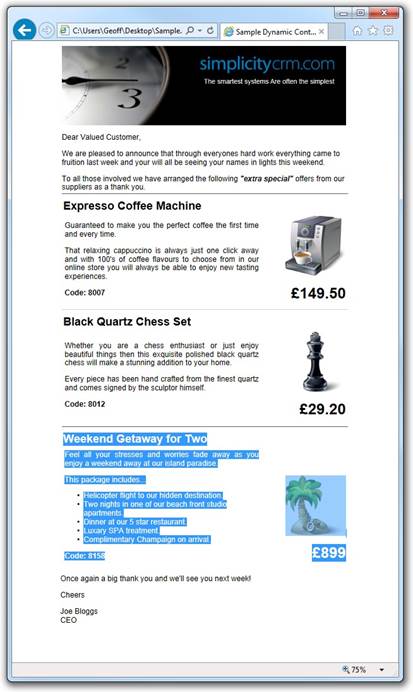
Email media merge fields for Dynamic Content.
We can now highlight our product section in our email media a replace this with the Dynamic Content we have now setup. This can be achieved by highlight what we want to replace and “Right Clicking” then selecting “Dynamic Content” and our the our newly defined dynamic content option.

Example as highlighted below.