Details
Name: Give your campaign a meaningful and relevant name eg, Sample Promotion – Launch eDM – April 2014
Segments: Use segments to define subsets of data from the entire database.
Note: Segments also affect reports and other analytical data. Segments can be used to determine media output and dynamic content.
Campaign Heirarchy: Can be used as a grouping tool, so all connecting campaigns are in the one Parent/Umbrella Campaign.
Note: You could have a parent campaign called CSB Adult eCRMs 2011 and all child/sub campaigns would be CSB Adult eCRM – Cat – January 2011; CSB Adult eCRM – Dog – February 2011; etc.
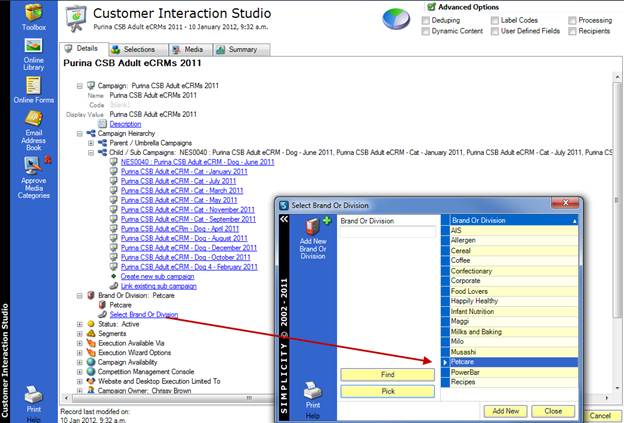
Brand or Division: Click on the hyperlinked text and choose from the drop down list to select a brand or division.
Status
Defaults to Active.
Inactive
Campaign analysis can no longer be viewed in campaign report portals or from the standard campaign report options in the web browser. Reports can be re-activated by changing the status back to Active. The report will be available the following day.
Archive
Removes all associated label codes, including those linked to online forms, and summarises all activities. Archiving also removes the report from the campaign report portals/web browser. Campaign reports cannot be re-instated once a campaign has been archived. Go through the checklist to verify all items on the archive checklist have been completed. The campaign will not be automatically processed until all options in the checklist have all been approved.
Segments
Segments are a sub-set of a full data set determined by the filter criteria used to define the sub-set.
All campaigns have a “Default” segment. If no segments are added to the campaign the “Default” segment will be used.
Segments can be used to
- Report on targeted consumer audiences based on engagement, location or other characteristics
- Send different media (creative) based on segment
- Include customised content based on segment.
Execution Wizard Options
To deploy your campaign using the Campaign Execution Wizard, tick the Desktop Execution Wizard. On completion of the campaign execution, un-tick the Desktop Execution Wizard option.

Note: Save the changes during the building of your campaign by clicking on the text “Customer Interaction Studio” at the top of the screen and clicking “save changes”. 
All workspaces can be DELETED by clicking the red X in the top right corner of the workspace.

REMEMBER: There is NO Control “Z” in the Customer Interaction Studio.
Campaign Owner
Person(s) who created the campaign. This will default to the person logged on at the time of creating the campaign if no owner is selected.
Campaign Recipient Options
Within the “Details” tab there are 3 options:
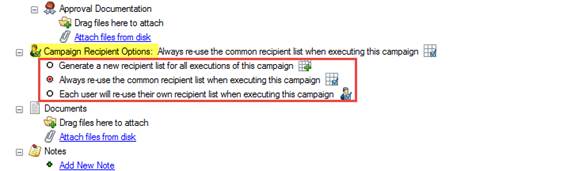
IMPORTANT NOTE by default “Always re-use the common recipient list when executing this campaign” is selected. If you require a refreshed data source list to be used for this execution due to updates in the data source, label codes or user defined fields since the worksheet was last created, then the below option should be ticked. Also Generate a new worksheet if you have created this campaign from a previous campaign or if you are for some reason just tweaking the campaign and using it again for a different purpose rather than creating a new campaign:

Achieved worksheets
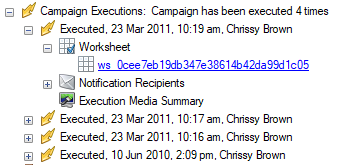
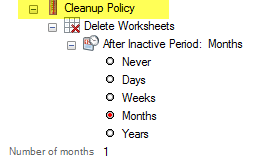
Under “Campaign executions” you can see how many times the campaign has been executed as well as the worksheet used for each send. Some other details such as date, time and person who executed the campaign will also show up. When the worksheet is no longer available it has been “Archived”, this is due to “Cleanup Policy” Simplicity offers and the cleanup parameters can be modified within the “Details” tab. The default parameters provide a balance between performance and persistence of worksheet data:
Documents
Documents can be stored here that relate to the campaign, eg, data brief, emails relating to the campaign.
Notes
Make Notes or comments relevant to the campaign, eg, Follow up campaign required in two months. Creates a record that is date and time stamped and records the person who has entered the Note.
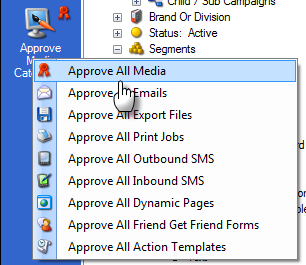
Media Approval
All media must be approved before executing the campaign. Click on the Approve Media Categories on the left hand toolbar and click on Approve All Media. Documents relating to the approval process can be saved under Approval Documentation.
Campaign Executions:
A worksheet is created every time the campaign is executed. A copy of every worksheet and a log of who executed the campaign and at what time is recorded here. Worksheets will be removed from the campaign during the archiving process.